- Are you stuck with the KMVD Suraksha Mitr Tagging Process? (2019)
- 1. The Vehicle number does not exist…
- 2. IMEI is already in use…
- 3. Vehicle already tagged…
- IMPORTANT
- DEVICE DATA
- SMS COMMANDS
- 4. No data received from device…
- 5. Improper Device Fitment…
- 6. Data packet from VLT device not received at server…
- 7. Activation SMS sending failed…
Are you stuck with the KMVD Suraksha Mitr Tagging Process? (2019)
Let us look at the most common challenges faced while trying to tag a commercial vehicle to KMVD’s (Kerala Motor Vehicle Department) Suraksha Mitr Portal.
Based on the feedback received from our partners, we compiled a list of a few common errors encountered by AIS 140 VLT Service Providers during the KMVD tagging process.
The solution for each issue mentioned in detail will be really helpful for service providers like you.
1. The Vehicle number does not exist…
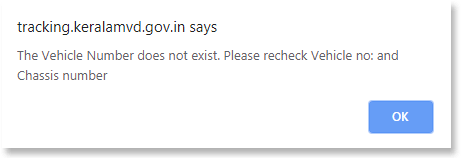
The above error notifies you that the system tried to verify vehicle details you entered in the Suraksha Mitr Tag vehicle form with a backend database.
It turned out that vehicle registration and chassis numbers are not available.
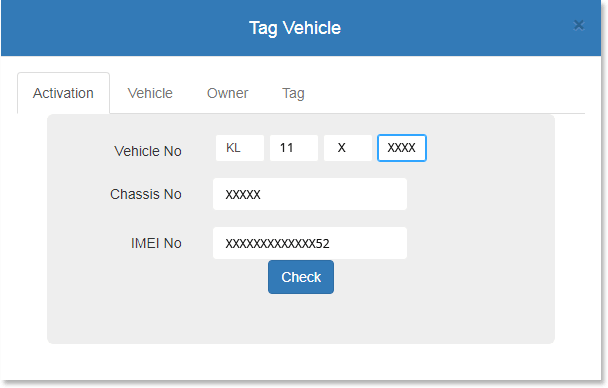
While you enter the details over Tag vehicle form,
the system checks for the authenticity of the vehicle details with the backend of National Informatics Centre (NIC).
The NIC (https://www.nic.in) is a premier science and technology organisation of Government of India in informatics services and information and communication technology applications.
If such an error pops up…
the next step is to contact the vehicle owner, confirm the vehicle plate and chassis details appearing in the Registration Certificate (RC).
If the error persists,
the vehicle owner may reach out to the Regional Transport Office (RTO) and get the vehicle details verified for any discrepancy.
Based on the confirmation from RTO, enter the right information in the same Tag vehicle form.
If your effort to tag the vehicle didn’t succeed, it might be because vehicle details are not up to date with the NIC.
Earlier the vehicle registration details used to be available only with NIC.
Now, the vehicle-related information is updated and made available in Parivahan portal as well. Parivahan (https://parivahan.gov.in) is an initiative by the Ministry of Road Transport & Highways (MORTH) to automate all Vehicle Registration and Driving License related activities of the country. And to create state and national level registers of vehicles/DL information.
The next step is to check if the vehicle details are available with Parivahan. Parivahan details can be accessed via Suraksha Mitr portal.
At the top of the page under the menu ‘VLT Tagging’, click on the submenu ‘VLT Tagging – Vahan’ appearing at the bottom.

Click the ‘Tag’ button

It takes you to the following screen i.e., Parivahan portal.
i) In the case of a new vehicle (where you haven’t got the permanent registration number),
Key-in Temporary Reg No. and IMEI.
Now Click ‘Check’ button
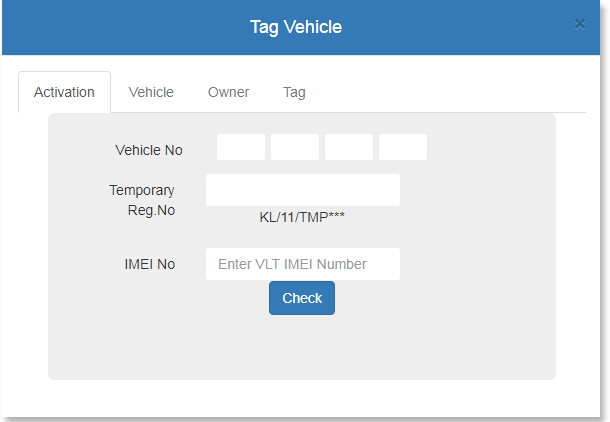
ii) In the case of a vehicle that has been issued a permanent registration number, on clicking the ‘Vehicle No’ tab in the above screen takes you to the next screen.
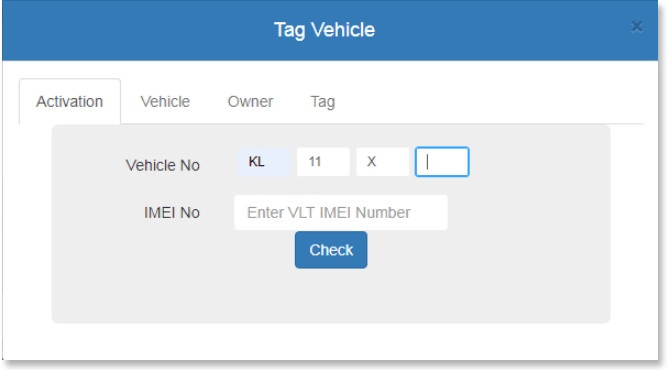
Enter the ‘Vehicle Registration No.’ and IMEI and click ‘Check’ button.
If the check is successful, you can proceed with the tagging process by following the normal steps.
In some cases, on entering the vehicle no. you might get the below error message.
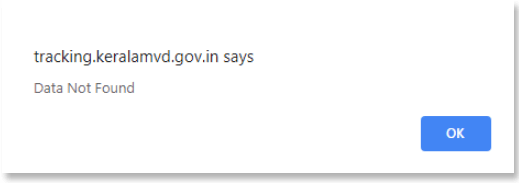
In such cases a letter need to be issued to the client in the below format so that they can submit the same while going for RTO’s periodic fitness check.
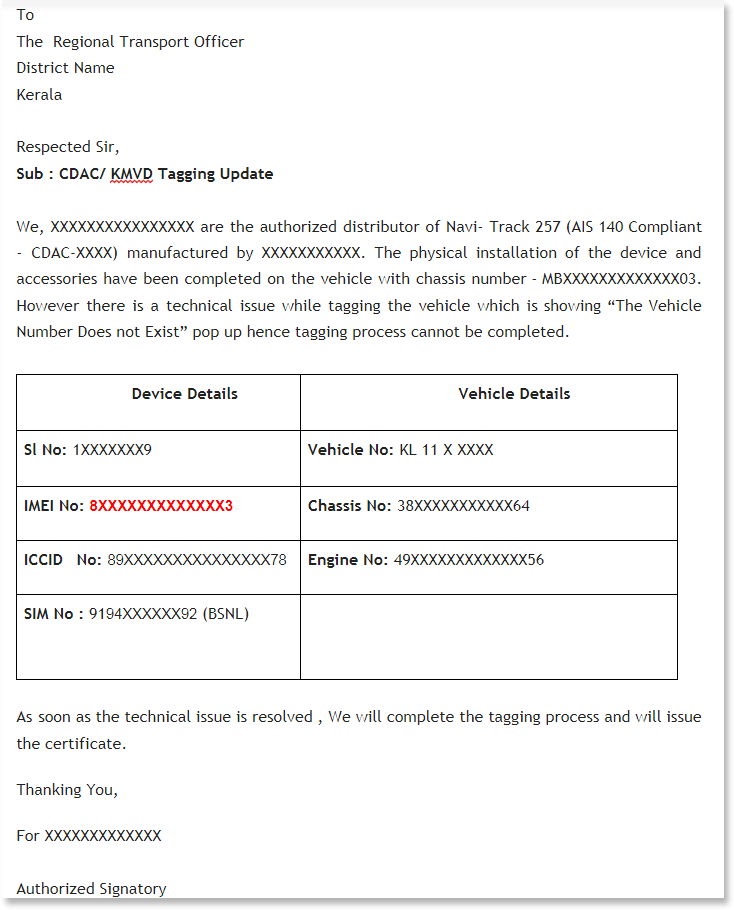
In the above case , you need to try tagging the vehicle again after a few days as it takes some time for the vehicle no. & chassis no. to be updated in the NIC or Parivahan portal.
2. IMEI is already in use…
You get the below error popup while trying to enter the IMEI No.

This error message indicates that the IMEI no. corresponding to your AIS device is already tagged in the Suraksha Mitr portal for some other vehicle.
In AVLView’s Partner Portal, search the same IMEI in ‘Global Search’ tab.
Here you can view the client for which the particular IMEI is assigned to.
If the IMEI is not available in the ‘Global Search’ tab,please reach out to AVL View Support team so that we can help you out in researching further.
3. Vehicle already tagged…
While trying to key in the Chassis No., you get the below error message.

i.) The tagging is already done by some other registered agency with the same Navitrack 257 AIS – 140 device.
ii.) The tagging is already done by a different registered agency with some other AIS – 140 device,but not Navitrack 257 AIS – 140.
In the second case,if the customer requests to get the vehicle tagged using Navitrack 257 AIS – 140 device you need to ask the customer to approach the respective RTO.
The tagging should get rejected in Surakshamitr portal and once this is done, you can retag the vehicle in the portal.
IMPORTANT
Before proceeding to CASE #4, let’s have look at AVLView Partner Portal’s ‘View Device Data’ tab and the SMS commands commonly used in fixing the errors.
DEVICE DATA
In AVL View Partner Portal’s ‘View Device Data’ tab,the below are the fields which are relevant with respect to the Suraksha mitr tagging process.
| FIELD | DESCRIPTION |
|---|---|
| Provider Name | The name of the E-Sim service provider |
| Packet type | Data packets can be ‘L’ (indicating Live) or ‘H’ (indicating ‘History) |
| Alert Type | Alert type should ideally be ‘NR’ (indicating Normal) or ‘HP’ (indicating Health Packet).All the below critical alerts need to be fixed depending on the issue.EA – Emergency Alert (Panic button pressed) DT – Device tampering or Panic button wire tampering BL – Battery Low BD- Battery disconnected TL- Tilt Alert Indicating that the device is in a sloping position |
| IMEI | The IMEI no. appearing on the VLT device |
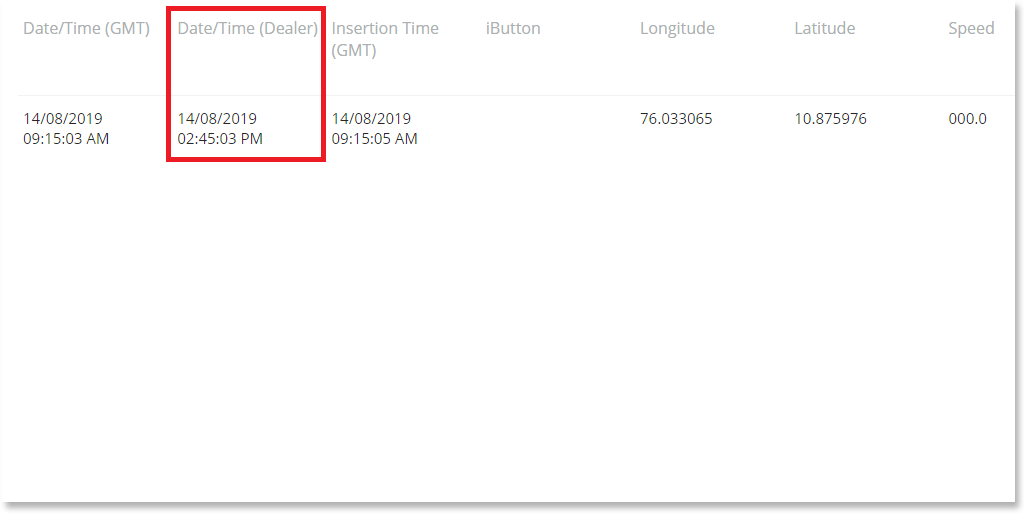
| Date/Time (Dealer) | The Date & Time (in IST) at which the latest data is received |
| D1 | Ignition Status (0 indicates ‘off’ and 1 indicates ‘on’) |
| D2 | Panic Button Status (0 indicates ‘off’ & 1 indicates ‘on’) |
| Satellites | Satellites value should be ideally above 11 |
| GSM Signal Level | 1 to 2 indicates low, 2-3 indicates medium & 4-5 means high GSM signal strength |
| External Power Millivolt | Indicates battery power which can be 12000 or 24000 depending on the vehicle type |
SMS COMMANDS
The below SMS commands are sent to the E- Sim No. of your Navitrack 257 AIS – 140 device during the vehicle tagging process in Surakshamitr portal.
NOTE – These SMS commands are specific to Navitrack 257 AIS – 140 devices and does not apply to any other AIS – 140 devices.
1. GETSTS – This SMS command is sent to check the GPS and GSM connectivity.
In the case of Navitrack 257 AIS – 140 device which is working perfectly, both GPS and GSM should ideally be ‘1’.
‘1’ indicates that there is sufficient satellite signals & cellular network coverage.
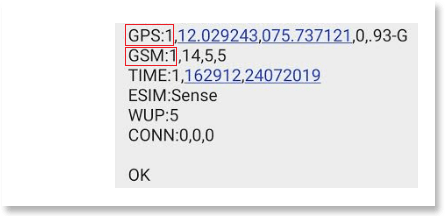
2. NOS – To check the normal stored data packets, we sent the SMS command ‘NOS’.
In order to ensure that the tagging process goes smoothly, the below fields should be 0 or at least less than 300.
Eco denotes Emergency Alerts
CrECo – Critical Emergency Alerts
Aco – Harsh Acceleration & Harsh braking
Pco – Normal stored data packets
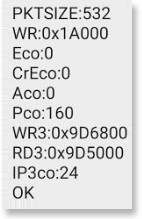
3. FLASH – After sending the SMS command ‘NOS’, if Eco,CrECo,Aco & PCO is more than 300 it indicates that there are historical data packets that needs to be cleared.
To clear the historical data packets, we send the SMS command ‘FLASH’. This command also prompts to send the latest data packets to the AIS device.
4. GETIOSTS – This command is sent to check the status of ‘DT’ (Device tampering). Ideally the DT field should show ‘0’.
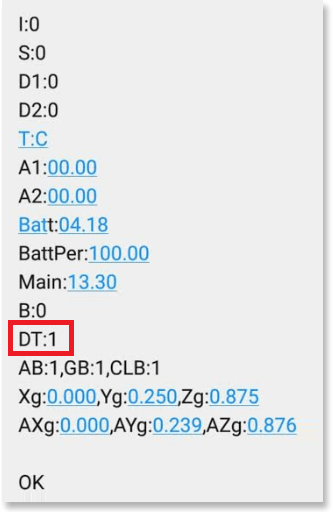
If DT shows ‘1’ it can happen due to the below 2 reasons.
1. Main power disconnection OR
2. Panic Button Wire – cut
4. No data received from device…
On entering the IMEI No., you get the below error.
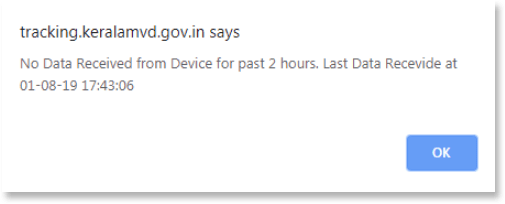
In this case,the below steps need to be followed.
1. The first step is to check if AIS device is communicating to AVL View server by checking in Partner portal.
2. Go to Partner Portal, search by the client name , select the vehicle and check the ‘View Device data’ tab. In the ‘Date/Time (Dealer)’ tab, see whether the latest date & time is being displayed.
3. The next step is to send the SMS command ‘GETSTS’ to the Esim No of your Navitrack AIS-140 device.
4. On receiving the message,see whether both GPS & GSM is ‘1’. This is to ensure that the AIS device is having proper GPS & GSM connectivity.
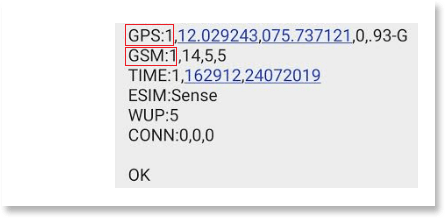
5. If GPS is 0,it indicates that AIS device is unable to receive satellite signals.
Most probably the hindrance could be due to the reason that the vehicle is parked in an underground basement or shady area.
Ask the owner to move the vehicle to an area where there is ample network coverage.
6. If GSM is 0,it indicates that the vehicle is out of cellular network coverage area.
Ask the owner to move the vehicle to an area where there is ample network coverage and the vehicle ignition need to be switched ‘ON’.
The frequency of data update will be more in ‘ON’ condition.
NOTE – When the vehicle ignition is switched off, the AIS device goes to sleep mode within a time interval of 10 minutes.
This time interval is configured by CDAC and it can vary according to the time set from their end.
The sleep mode feature is enabled to save vehicle battery.When the vehicle is in sleep mode,the data will be sent to the CDAC server every one hour.
When the vehicle ignition is switched on, the device will switch to halt mode and the data update happens in this state as well.
Once the vehicle starts moving, the device will automatically switch back from halt mode to active mode.
7. Try to tag the vehicle again by entering the IMEI No.
8. If it still doesn’t work, send SMS command ‘NOS’ to the ESim No.
This command is sent to check the normal stored data packets.
Now you will receive the below SMS.
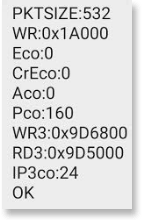
Here,
Eco denotes Emergency Alerts
CrECo – Critical Emergency Alerts
Aco – Harsh Acceleration & Harsh braking
Pco – Normal stored data packets
IMPORTANT – If Eco,CrECo,Aco & PCO is more than 300,send SMS command ‘FLASH’ to the Esim No.of your Navitrack AIS-140 device and clear the historical data packets.
This command also prompts to send the latest data packets to the AIS device.
9. Try tagging the vehicle again by entering the IMEI No.
10. Now click the Check button.
NOTE – The SMS commands mentioned above are specific to Navitrack 257 AIS – 140 devices.
5. Improper Device Fitment…
While trying to enter the IMEI No., the below error pops up.
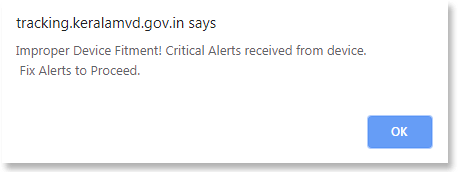
Click the blue icon in the below screen which takes you to the next window
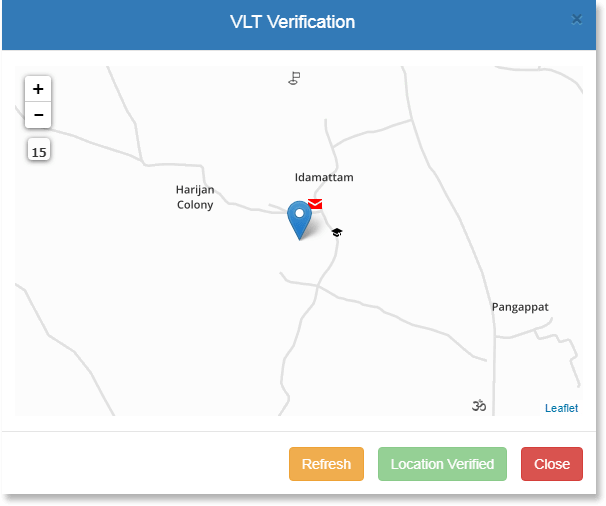
Now in the below screen, click on ‘Clear alerts & Check Again’.
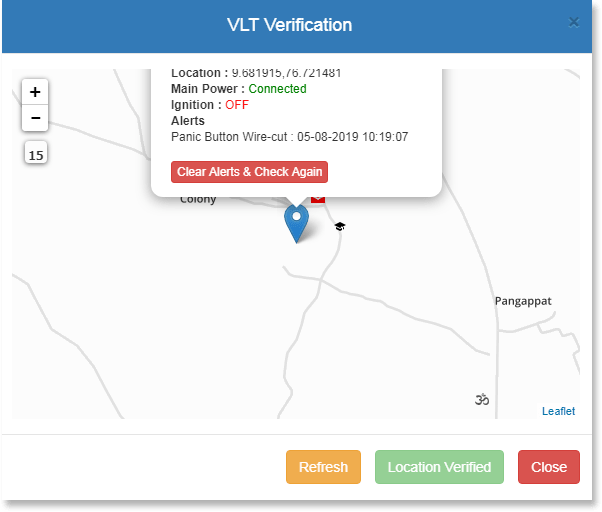
The below message (marked in green) is a clear indication that the AIS device has been sending critical alerts during the last 2 hours.
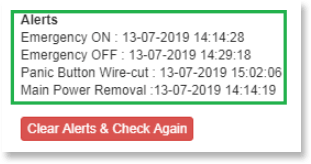
It can happen due to 2 reasons.
1. Main power disconnection OR
2. Panic Button Wire – cut
In this case, the first step is to send the SMS command ‘GETIOSTS’ to the E Sim No.of your AIS Navitrack device and check the current status.
On receiving the SMS ,you need to check the status of ‘DT’ (Device tampering). There are 2 cases i.e. DT shows 0 or 1.
i.) When DT shows 0.
Please keep the vehicle ignition ‘On’ for sometime.
Now click ‘Clear Alerts & Check Again’ button and click ‘Refresh’ button.If the critical alerts are cleared, it will take you to the next screen.
NOTE – 3 data packets should be received after clearing alerts.
You will receive the below message. On receiving the 3rd data packet, it will automatically proceed to the next screen.

If the critical alerts are still not cleared, then you will still be receiving the below error message.
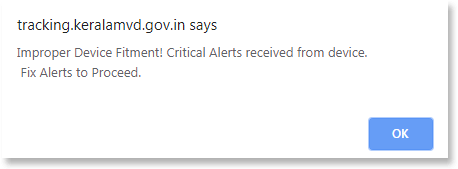
In such cases a technician need to visit the site and inspect the vehicle which is mentioned in detail in the next case.
i.) When DT shows 1.
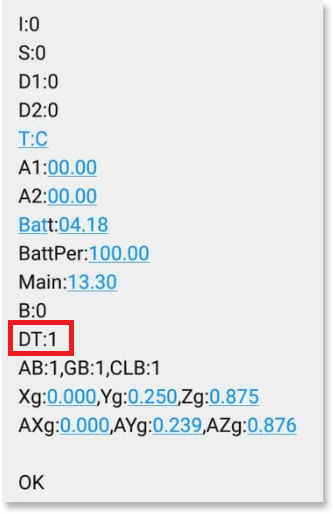
This can happen due to the below 2 reasons.
1. Main power disconnection OR
2. Panic Button Wire – cut
The next step is to send a technician for inspecting the vehicle and the below 3 areas need to be checked.
1. Device main power supply connection
2. Panic Button power supply connection
3. Battery main supply – The battery switch should be bypassed
Once technician checks and confirms the above 3 points,go to AVL View Partner Portal’s ‘View Device data’ tab and check the ‘Packet Type’.
Please ensure that the live data packets are received and the alert type is ‘normal’.
Try tagging the vehicle again.Please ensure that the technician remains at the site till the time the vehicle is tagged . We can also ensure that the latest data is received by sending the SMS Commands.
6. Data packet from VLT device not received at server…
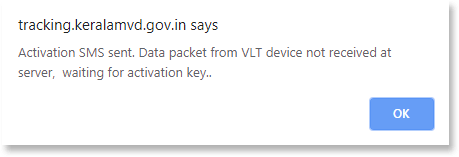
In the window below,
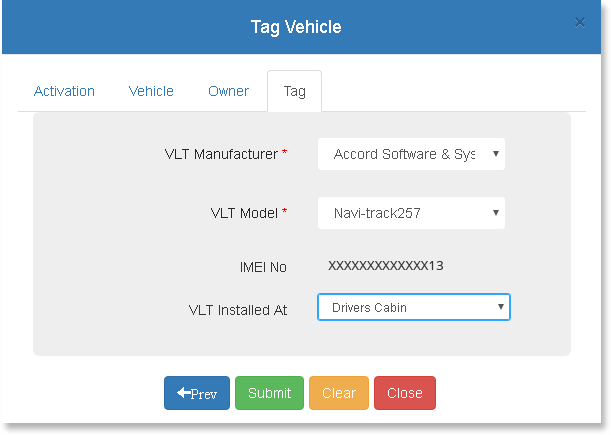
While clicking the Submit button,sometimes the below error message pops up.

NOTE – This error message indicates that when the 16 digit activation key was sent from CDAC’s (Centre for Development of Advanced Computing) gateway to both the E sim numbers.
The AIS device did not acknowledge by sending data packets back to the CDAC server.
For fixing the issue, you have to repeat the steps mentioned in CASE # 4 by sending the SMS command ‘GETSTS’.
7. Activation SMS sending failed…

In the below screen,you are about to click the ‘Submit’ button
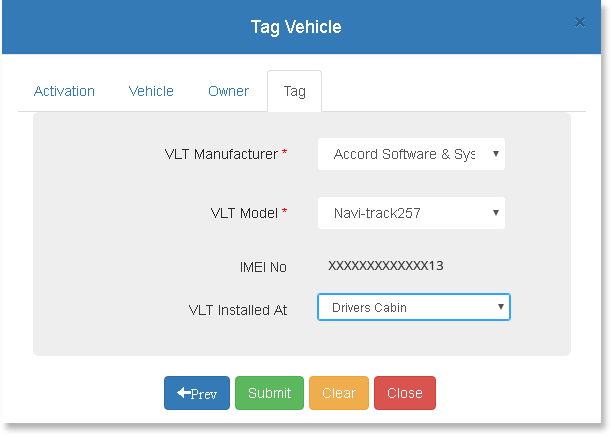
Now the below error message pops up.

This error message can popup due to 2 reasons.
1. In the below stage, though the OTP was sent to your mobile phone, you didn’t enter the same in the Surakshamitr portal.
If you repeat the OTP generation process for more than 5 times, you will receive this error.

2. It can also be due to the reason that there is a technical issue on the side of CDAC server.
In such cases , you can reach out to the email id surakshamitr@cdac.in. Once the issue is resolved on the CDAC side, repeat the tagging process.
Hope your tagging process went smooth.
If you are still facing issues, please feel free to reach out to us.


