Teltonika - Configure and Install FMB 120 GPS Device
Understanding Your FMB 120
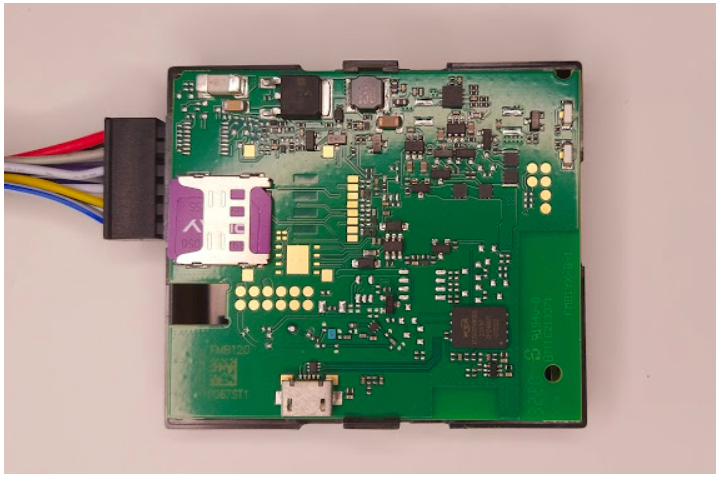
Picture this: You’ve entered the world of GPS tracking, and you’ve got this little powerhouse called the Teltonika FMB120 in your hands.
It might look small, but let me tell you, it’s packed with some serious tracking mojo. This GPS tracker comes equipped with high-gain GSM and GNSS antennas – the good stuff that ensures it’s on top of its game.
But this gadget isn’t just about knowing where something is; it’s about knowing how to use that information effectively.
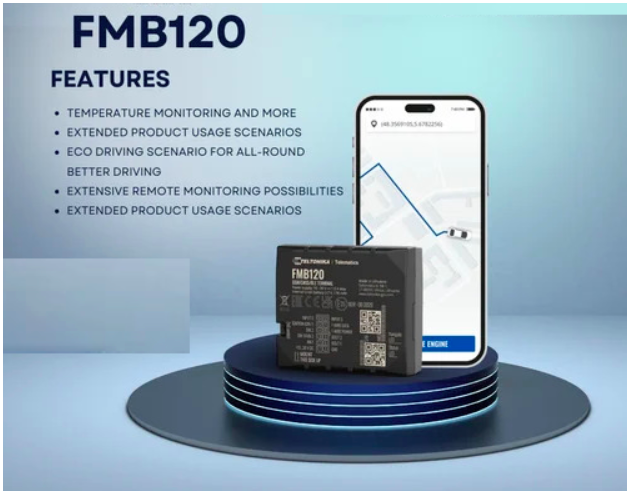
Image source: Indiamart
In this article, I’m going to be your tour guide through this nifty device.
Versatility for Diverse Applications Let’s start by learning how versatile the Teltonika FMB120 can be. This little beast has a knack for fitting into various roles. Explore some of these applications.
Fleet Management
Imagine you’re running a fleet of vehicles, be it trucks, cars, or bikes. You need to know where your vehicles are, how they’re performing, and if they’re taking the most efficient routes. The FMB120 is your solution, offering real-time tracking, data collection, and a whole bunch of other cool features to make fleet management a breeze.
Car Rental Companies
Now, picture a car rental business. You’ve got a fleet of cars available for rent, but you need to keep them secure, allocate them efficiently, and make sure they’re well-maintained. The FMB120 steps in here too, providing that added layer of security and maintenance tracking.
Taxi Companies
Taxi services are all about getting passengers from point A to B quickly and safely. With the FMB120, you can ensure your drivers are taking the best routes, offering great service, and keeping passengers safe.
Public Transport
If you’re running public transport, you know how important it is to have accurate data for route optimization, ensuring your vehicles are on time, and providing passengers with the right information. The FMB120 helps in this regard, making your public transport service more efficient.
Logistics Companies
Logistics operations rely on precision. Knowing where your shipments are, monitoring the conditions of your vehicles, and optimizing delivery routes is essential. The FMB120 does all of this and more.
Remote Object Control
Now, imagine you’ve got something to control remotely. The FMB120 takes remote object control to the next level. Let’s check out some of its cool functions:
Engine Status Monitoring
Think about being able to monitor your engine’s status remotely. This feature can save you money on maintenance and ensure your vehicle is always reliable.
Truck Door Control
In the logistics world, truck doors are important. The FMB120 lets you control them remotely, boosting your operational efficiency and cargo security. No need to worry about valuable shipments anymore.
Initial Setup: Unboxing to First Use
Let’s dive into the setup. Imagine you’ve just unboxed your Teltonika FMB120, and you’re about to set it up. Here’s a step-by-step guide to make this process as smooth as possible.
Kit/Box Contents
Open that box and you’ll find these goodies inside:
- Teltonika FMB120 tracking device
- M2M SIM with a data package
- 20 pin I/O cable
- 3M Scotchlok, connectors, double-sided tape, and zip ties
Noting down IMEI & SIM GSM number
Before you get too excited, you need to note down a couple of numbers. First, the International Mobile Equipment Identity or IMEI number, a unique 15-digit identifier for your device. It’s usually on the bottom of your GPS tracker. You need this number to register your device.
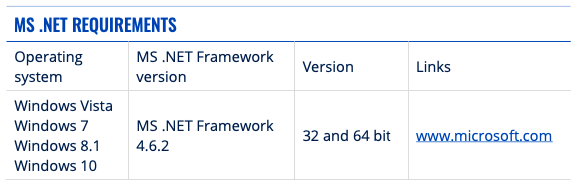
Prerequisites – Windows PC Requirements
Hold on, you’re not done yet. You also need a Windows PC to configure your FMB120. Make sure it’s got the Microsoft .NET framework. If it doesn’t, no worries – you can download it here.
Prerequisites – Inserting the SIM Card and Battery
Now, let’s talk about hardware. You’ll need to insert your SIM card and battery.
- Remove the FMB120 cover using a plastic pry tool from both sides of the device.
- Insert a GPRS-enabled Micro-SIM card as shown in the provided image.
- Connect the battery (a 170 mAh Li-ion rechargeable 3.7V battery) ensuring it doesn’t obstruct other device components.
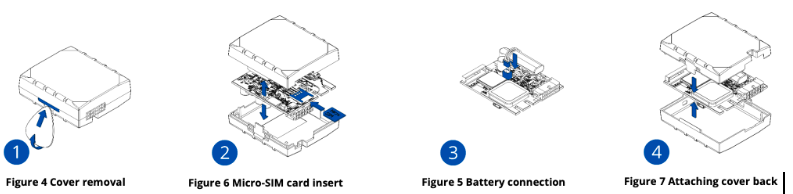
Image source: teltonika.com
Navigating the Interface
Accessing Key Functions
As you dive into the world of device interface, let’s walk through the intricacies. It’s like embarking on a guided tour, where you’ll discover each part along the way, without missing any detail.
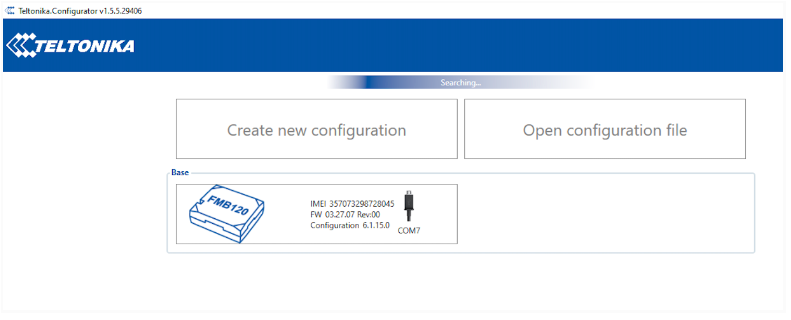
First things first, imagine Teltonika Configurator as your trusty guide through this interface. It’s more than just software; it’s a powerful tool that allows you to manage your tracking devices with ease. Think of it as a multi-tool for overseeing various device types all in one place.
With this software in hand, you’ll find a treasure trove of functions at your disposal:
-
Firmware Updates: You can keep our devices up to date with the latest enhancements by using this feature. It’s like giving your devices a fresh coat of paint, ensuring they’re in top form.
-
Device Diagnostics: Just like a doctor diagnoses your health, this tool checks up on our devices. It tells you if everything is running smoothly or if there’s a hiccup in the system.
-
Status Checks: A bit like a quick health check, you can see if our devices are ‘green’ and working well. If there’s a ‘red flag,’ you know something needs attention.
-
Debugging: If there’s an issue, debugging is our problem solver. It’s like the detective in a mystery novel, helping you figure out what went wrong.
Efficient navigation tips
Now, for some handy tips on efficient navigation:
-
Familiarization: As in any new place, understanding the layout and menu structure helps you get around faster. It’s like knowing the street names in a new city.
-
Device Profiles: Think of these as custom settings for different situations. You can save these profiles to make things quicker in the future. It’s like having different ‘outfits’ for different occasions.
-
Help and Documentation: Teltonika doesn’t leave you in the dark. It provides you with a comprehensive help guide. It’s like having a map when you’re exploring a new place. It answers your questions and shows you the way.
-
Stay Updated: Just like updating your phone to get new features, keeping the software up-to-date ensures you have access to all the latest enhancements. It’s like keeping your toolbox full and up-to-date.
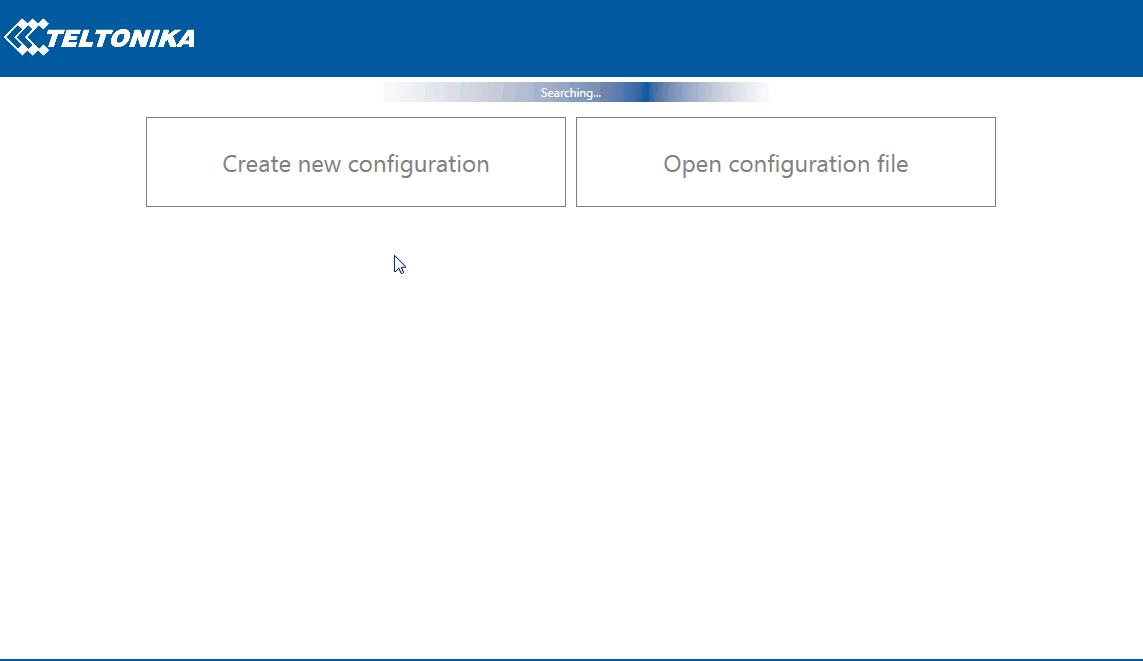
Image source: https://teltonika-gps.com/
So, with your guide, the Teltonika Configurator, and these navigation tips, you’re well-equipped to navigate the intricate world of your Teltonika FMB120 Configurator. It’s like a journey where every detail matters.
Configuration for Optimal Performance
But wait, there’s more! Let’s talk about configuration for optimal performance. This part is crucial because it’s where you make your FMB120 dance to your tune.
Power-up the FMB120 Device
Power up the FMB120 device using the supplied power cable (DC – 10-30 V).
Switch it on by pressing the power button.
LED lights should start blinking (please refer LED indicators section at the end of this section) on your FMB120 device.
Connect the powered device
Now, let’s get your device talking to your computer. You have two options: you can plug it in using the micro USB cable, or you can do it wirelessly with Bluetooth.
If you’re going with the Bluetooth route, here’s what to do:
- First, switch on the Bluetooth feature on your computer.
- Then, find the device named “FMBxxx_last_7_imei_digits.” It’s kind of like giving your computer’s secret handshake.
- Type in the default password, which is 5555, and then press the “Connect” button.
- Finally, select “Done,” and your device will be paired up with your computer. It’s like making new friends, but in the tech world!
- Launch configurator.exe file
And to get started with this newfound friend, all you have to do is click on the device icon.That’s your first step into a world of possibilities.
Loading pre-stored values to the device.
Imagine this: your computer is like a detective, and it has just discovered your FMB120 device, your trusty sidekick. Now, it’s time to give your sidekick some special instructions.
You see, there’s a secret stash of important information stored in a hidden file. To unlock this treasure trove, you need to click on the “Load from File” tab. It’s like revealing a hidden map that will guide you on your journey.
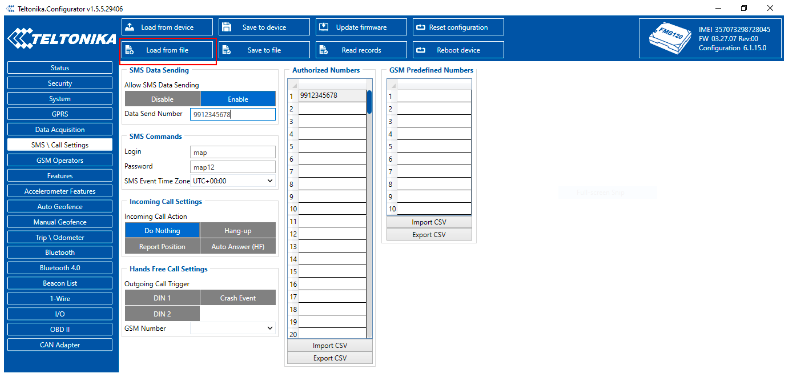
Image source: https://teltonika-gps.com/
Your next task is to choose that file from your computer.
It’s like selecting the key that will unlock the chest’s hidden wonders. So, choose and open the saved file, and you’ll be one step closer to unveiling the mysteries within.
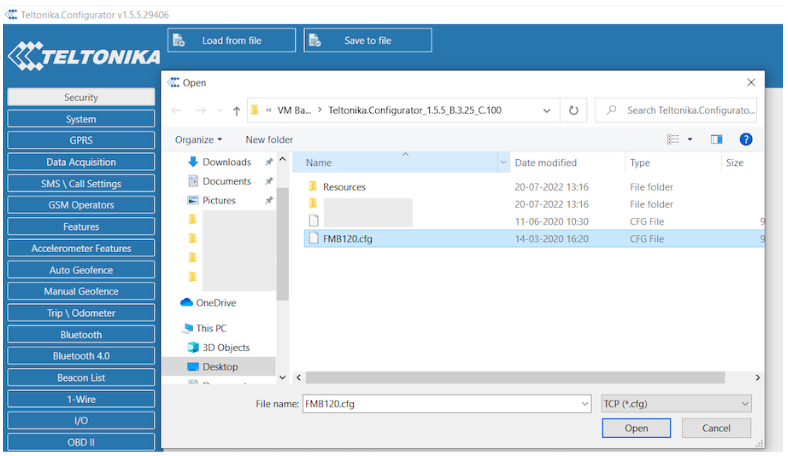
Image source: https://teltonika-gps.com/
When the default values are loaded onto your device, the device screen lights up, and your journey into the world of information begins.
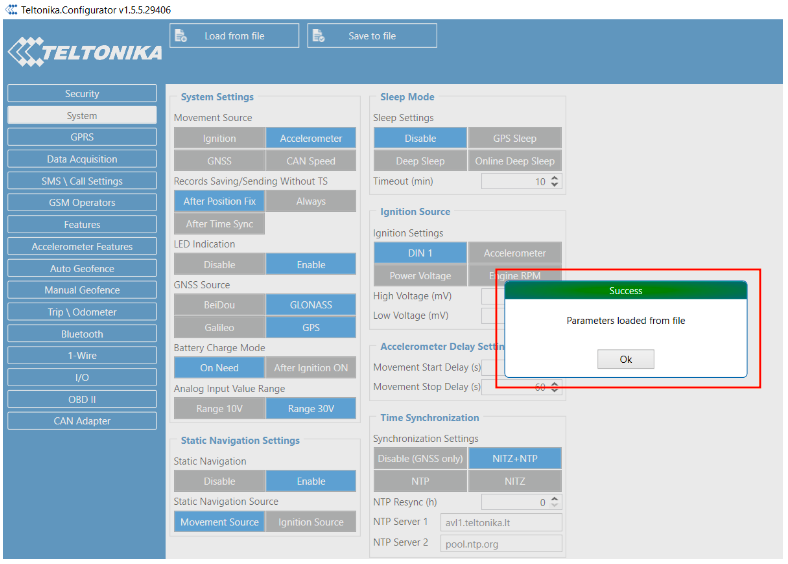
Image source: https://teltonika-gps.com/
Verifying Server settings
Now that you’ve loaded the default values onto the device, it’s important to make sure everything is just right.
Click on the GPRS tab to check if the domain is set as “serv.avlview.com” and the port is set to “6677.” It’s like double-checking all the details to ensure that your device will work perfectly.
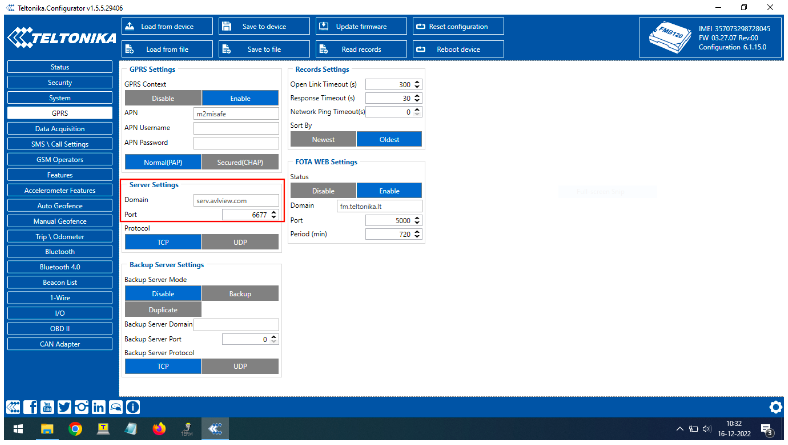
Image source: https://teltonika-gps.com/
- Confirming the values set in *Record Settings
Imagine your GPS device is like a super-smart helper, and you want to make sure it works perfectly. To do that, you need to check two important things:
- Open Link Timeout (s): This should be set to 259200. It’s like giving your helper enough time to connect and share information.
- Response Timeout (s): This one should be set to 30. It’s like setting a time limit for your helper to get back to you.
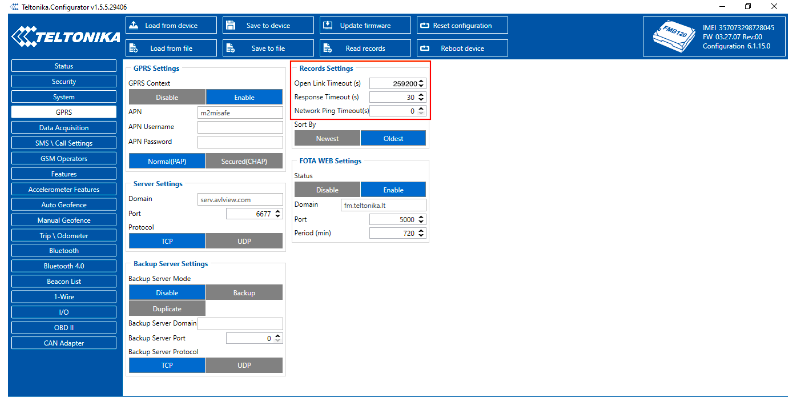
Image source: https://teltonika-gps.com/
- Set SIM card operator APN Alright, you’ve double-checked those record value settings, and now you’re onto the next part.
Once you’ve got those values squared away, it’s time to pick the right APN (that’s Access Point Name) for your SIM card operator. Don’t worry; it’s not as complicated as it sounds.
You can find a list of these APNs over at this link (https://www.teltonika.org/apn-list/). Just choose the one that matches your operator, and then type it into the “APN” column.
And in case you can’t find your operator on that list, no worries – just get in touch with your SIM operator, and they’ll give you the right one.
It’s all about making sure your device is in sync with your operator’s network.
Image source: https://teltonika-gps.com/
- Verify data acquisition values
You’re on a roll here! Now that the APN is sorted, let’s make sure everything lines up.
Take a look at the data acquisition values displayed in the configurator. They should match up with the ones you see on the screen below.
This step is all about confirming that your device is set up to capture the right data. It’s like making sure the camera lens is focused perfectly – you want everything to be crystal clear. So, check those values and make sure they match the ones you’re expecting.
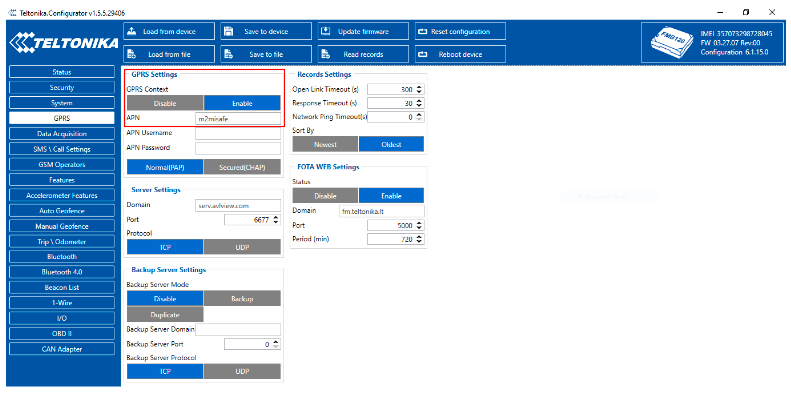
Image source: https://teltonika-gps.com/
- SMS/Call settings
You’re making great progress! Now, you need to set up something essential.
Enter the phone number of your SIM card. This is crucial for wirelessly configuring your tracker. Also, don’t forget to set your login and password. These will allow you to send SMS commands to your FMB120 device. It’s like having a secret code to control your device from afar.
If you’re curious about what SMS commands you can use, just refer to the SMS command list.It’s your guide to unlocking the full potential of your FMB120 device.
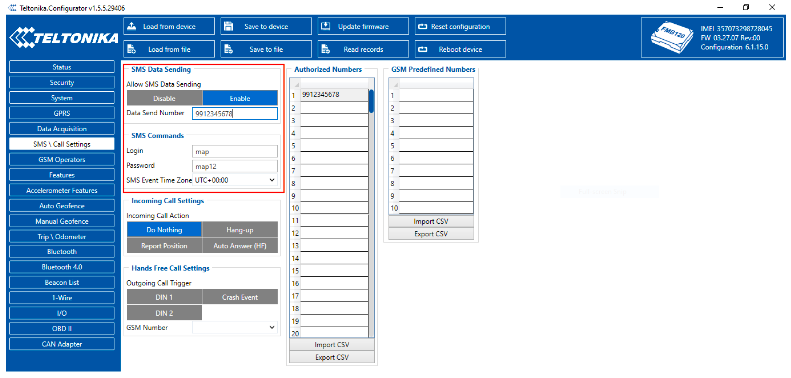
Image source: https://teltonika-gps.com/
- Saving all parameters to device You’re almost done with configuring your FMB 120 device.
All the parameters are verified now and the next step is to save all the pre-set values to your device.
Click the “Save to device” tab and save all the values to your device.

Image source: https://teltonika-gps.com/
*Led Indicators
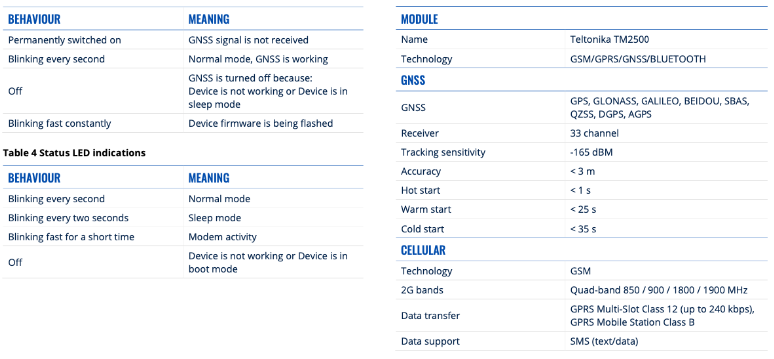
Image source: https://teltonika-gps.com/
Troubleshooting – Common Issues – FMB120
Hold on, you’re not out of the woods just yet. Sometimes, things don’t go as planned. Here’s what you can do:
Scenario 1 – The Location Remains Constant When the Vehicle Is in Motion
If your device is having trouble updating the location when the vehicle is moving, it might be because the GPS antenna isn’t getting a clear view of the sky. To fix this, make sure the device is correctly installed and try performing a hardware reset with an SMS command: “Reset.”
Scenario 2 – The Device Is Not Communicating Any Data to the Tracking Platform
If your FMB120 isn’t sending any data to the tracking platform, try these steps:
- Verify the GPS and GPRS status with an SMS command.
- Check for active GPS and GPRS connectivity using commands like “getgps” and “getstatus.”
Scenario 3 – The Device Is Unable to Detect Ignition
If the device can’t seem to detect the ignition status, check your ignition source configuration. It should be set to Digital Input, and don’t forget to enable the digital input in the IO settings menu.
Scenario 4 – The Device Is Unable to Identify Eco-Driving Events
Want to keep an eye on your driver’s eco-driving habits? Make sure you’ve activated the eco-driving feature in the ‘Features’ section and set the threshold values according to your vehicle’s terrain.
Scenario 5 – The Device Configurator Is Unable to Detect the FMB120 Device
If your device isn’t showing up in the Configurator, here’s what you can do:
-
Check if the FMB120 USB driver is correctly installed on your computer. You can download it from this link
-
Ensure the .NET Framework recommended for installation is properly set up on your PC.
-
Make sure the device is connected to a power supply.
Advanced Features and Tweaks
##Now, let’s talk about the cool stuff. The FMB120 has some advanced features that can take your tracking game to a whole new level. Let’s take a look:
Geofencing
Geofencing is like setting virtual boundaries on your map. You can define areas where you want the device to be or where it should avoid. If the device crosses these virtual lines, you’ll get an alert. Cool, right?
Advanced Reporting
Sometimes, you need data at specific intervals. The FMB120 lets you choose how often your location and other data are sent to the server. It’s all about getting the right info at the right time.
Input/Output Ports
This device is no one-trick pony. It comes with various input and output ports that can be configured for different purposes. You can connect sensors or relays for remote control – the possibilities are endless.
Fuel Monitoring
You can attach fuel level sensors to keep an eye on your vehicle’s fuel consumption and detect fuel theft or anomalies. It’s like having a virtual fuel gauge, but even smarter.
Driver Behavior Monitoring
The FMB120 can record data related to driver behavior, such as speeding, harsh braking, and quick acceleration. It’s like having a driving coach on board.
Remote Configuration
Need to update your device’s settings on the fly? No problem. With tools like the Teltonika Configurator, you can do it remotely. Say goodbye to manual tweaks.
Over-the-Air (OTA) Updates
Staying up-to-date is important. The FMB120 supports OTA firmware updates, which means you can keep the device’s software fresh without even touching it.
Bluetooth Connectivity
Some FMB120 models come with Bluetooth capabilities. This lets you connect external devices and sensors, opening up a world of possibilities.
SOS and Panic Button
When things go wrong, you’ve got a safety net. You can trigger an SOS alert, and it will be sent to a predefined contact. It’s peace of mind in your pocket.
Beacon Feature for Driver and Trailer Identification
The beacon feature is like magic. You can pair Bluetooth beacons with your FMB120 to identify drivers and trailers. It’s like giving each driver and trailer their own digital fingerprint.
Advanced Canbus Data Monitoring
If you’re managing a fleet, you’ll love this. The FMB120 can connect to your vehicle’s CAN (Controller Area Network) data. It gives you essential info like engine RPM, vehicle speed, fuel consumption, and more.
Supports BLE Fuel Sensors, Temperature, and Humidity Sensors
Bluetooth Low Energy (BLE) fuel sensors, temperature sensors, and humidity sensors are on the menu too. They offer valuable data for tracking and monitoring.
Maintaining Your FMB 120
You’ve covered a lot, but here’s a reminder to keep your FMB120 running like a champ:
Regular Inspection
Give your device a once-over now and then. Make sure it’s in good shape, connections are secure, and there’s no wear and tear.
Firmware Updates
Stay updated with the latest firmware. It might have bug fixes and new features to keep your FMB120 at its best.
Power Source
Keep an eye on your power source. Make sure it’s stable, and if you’re using a battery, replace it when needed to avoid disruptions.
Antenna Maintenance
If your device has an external antenna, ensure it’s in good condition. Clean it regularly to ensure a strong signal.
Temperature and Ventilation
Keep the device away from extreme temperatures, and ensure it has enough airflow to prevent overheating.
Secure Mounting
Make sure your FMB120 is mounted securely in your vehicle or asset. Vibrations can affect performance and even cause damage.
Backup Battery
If you’ve got a backup battery, check its condition and replace it if it’s no longer holding a charge.
Data Management
Regularly review and manage your data. Clear or archive old data to free up storage space.
Sensor Calibration
If you’re using sensors, follow the manufacturer’s recommendations for calibration to ensure accurate readings.
Network Connectivity
Monitor your network connectivity and address any issues promptly.
Backup and Configuration
Regularly back up your device’s configuration settings, and keep a record of your device’s unique identifiers and settings.
Training and Support
Make sure your team knows how to use the FMB120 and associated software. Knowledge is power.
Security
Implement security measures to protect your device and the data it generates. Strong passwords and access controls are your friends.
So, there you have it, your guide to understanding the Teltonika FMB120. This little device might be small, but it’s got a world of possibilities packed inside.
Whether you’re managing a fleet, tracking individual cars, or monitoring valuable assets, the FMB120 is your trusted sidekick. And with the right know-how, you’re ready to conquer any tracking challenge that comes your way. Happy tracking!
Here is a Sample maintenance checklist