Your office & customer offices on the map
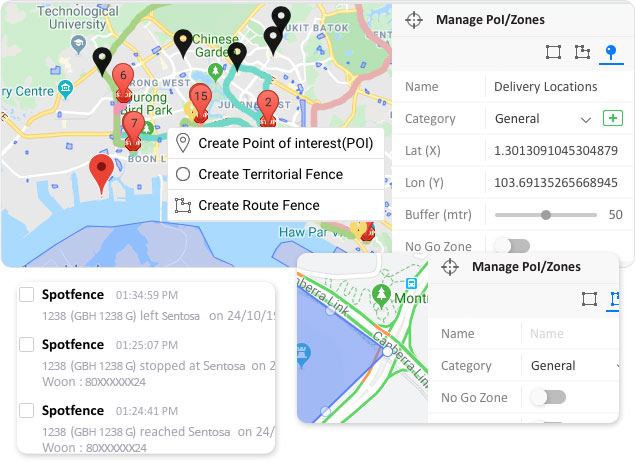
Mark delivery locations on the map
You will get to know when a vehicle enters or leaves your client’s location. Add as many waypoints or points of interest (PoI) as you wish to; no limits.
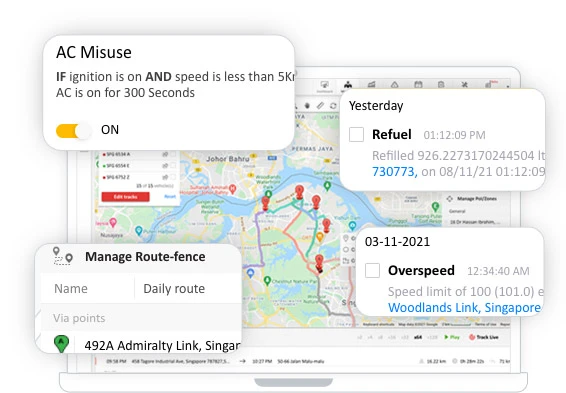
Generate a landmark history report with timestamp
- Mark your clients’ location (PoI)
- Expected time of delivery (ETD)
Tune every view to fit your fleet operation
Set up views, work with your data, and make it meaningful. View colour coded live, past vehicle tracks, and share the actionable information.
Mark all your delivery locations on the map
Mark customer offices, branches and generate a detailed landmark history report with a timestamp
of each exit or entry to know if the stop was authorized or not.
Points of interest/Delivery points
Points of Interest (POIs) are useful places on a map.
Some examples include warehouses, distribution centers, delivery points, bus stops, student pickup/drop off points, service centers, labour camps, or whatever they are.
You can now plot all your business points/landmarks as Points of Interest (PoI’s).
You can even set alerts to notify you when a vehicle enters or leaves a point.
- Add a new PoI using lat-long values.
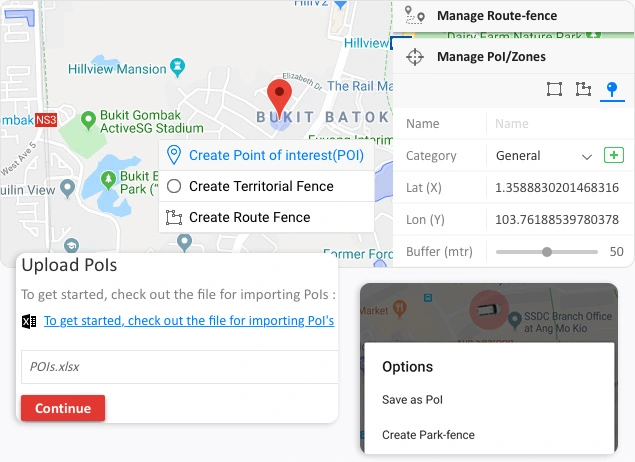
- Upload all PoIs by once.
- Add vehicle’s current location as PoI on mobile device.
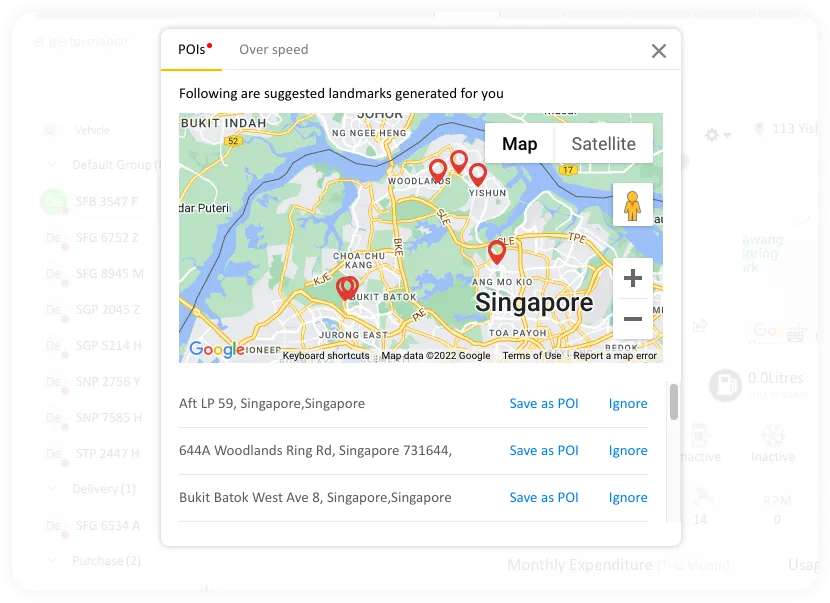
Add stop points as PoI
You may often find it hard to find the exact delivery points and mark them as PoIs on map.
The good news is that the vehicle tracking system automatically process historical data and suggests PoIs based on the stop points your vehicles made.
- Delivery points or PoIs are colour coded to easily identify categories (e.g. red for school, blue for bus stops etc).
- Define larger buffer range for PoIs (10m to 100m).
- Mark unauthorized to enter locations as ‘No-go zones’.
- Get alerts
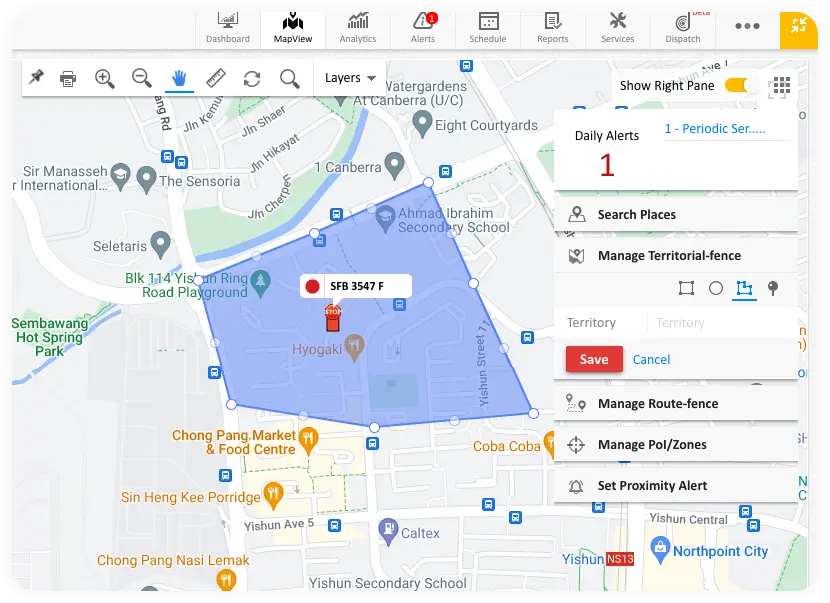
Create geofence or territorial fence
A geofence or territorial fence is a virtual line that marks the perimeter of an area. Geofences can help fleet owners like you track your vehicles as they operate within specific borders.
- Ensures that your trucks are operating within specific borders.
- Receive alerts when a vehicle enters or exits a territory.
- Help you with data on vehicles moving in/out of the perimeter fence.
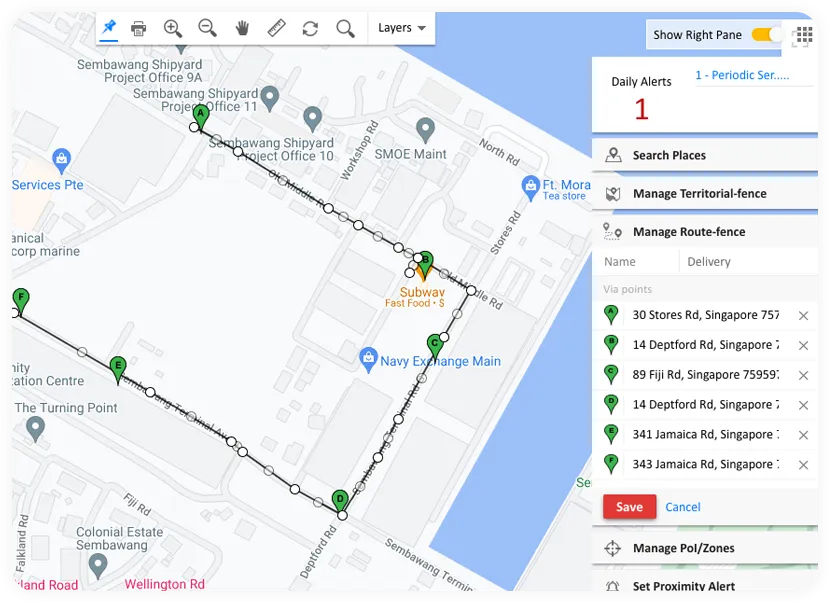
Route fence
Route fence in Geographic Information System (GIS) is a virtual line or path drawn in the map to show a transportation route.
Route fence in fleet management software is used to assign predefined routes to vehicles.
A fleet management software can be used to configure and generate alerts/notifications in case a deviation happens in the predefined route.
Route fence helps in;
- Scheduling a trip well in advance.
- Cutdown transportation cost.
- Improving dispatch.
- Marking via points or delivery locations.
Create park fence
A park fence is a virtual line that forms an imaginary barrier around the perimeter of your car when it’s parked.
Just imagine a situation where your truck is parked in a remote location with valuable goods in it. Park fence is intended to make the vehicle safe from being stolen. If the system detects the vehicle moving out of the fence, it will immediately send an alert.
- Create a park fence for your vehicles.
- Secure your vehicle and valuable assets.
- Get notified in the event of vehicle movement.
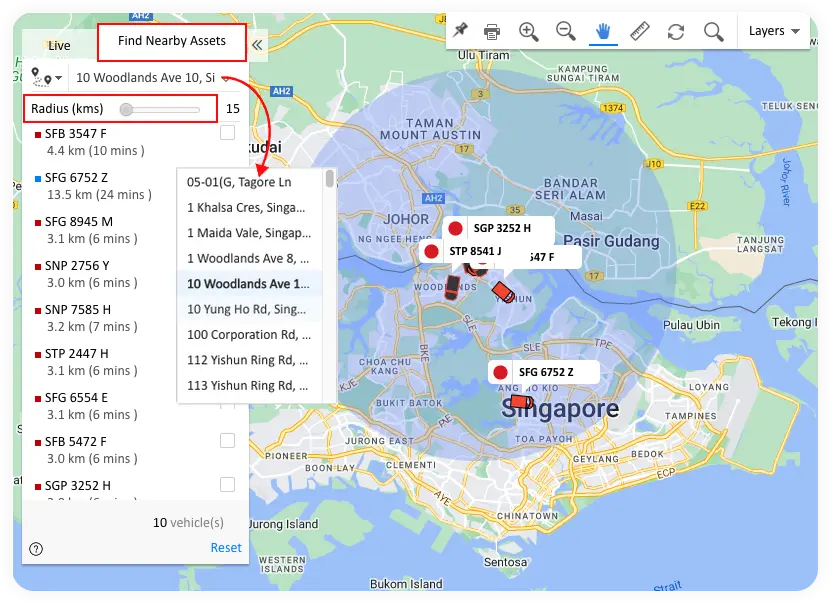
Find nearby vehicles/assets using PoI
Ever imagined a situation where one of your fleets stopped abruptly and your driver was helpless to do something on his own? “Find nearby assets” feature can be of great help in a situation like this.
You could search for a PoI or a place on the Map that you wish to set as a point, to find the vehicles around.
- Search for vehicles using a saved PoI/Zone.
- Set a desired radius (kms) to search for the nearby vehicles.
- Feature is of great help in emergency situations.
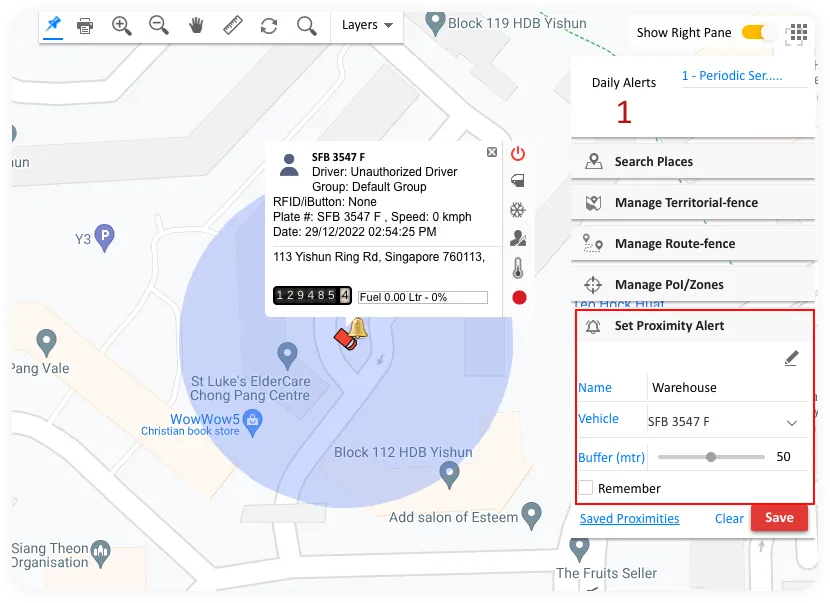
Setting a proximity location
Assume you manage a number of fleets with different delivery locations. It would be great if you get notified every time your vehicle reaches the delivery location or a proximity point.
To achieve this easily, just create proximity points, selecting a desired buffer (metre) on the map and configure alerts to receive notifications.
Once configured, an alert will be triggered when a vehicle enters into the buffer zone drawn over a point.
- Option to set buffer metre for the proximity point.
- Receive alerts on the web.
- Receive alert every time the vehicle enters the proximity point.
Suggested PoIs
Isn’t it amazing to be presented with a list of important points of interest (PoIs) based on the historical journey of your trucks? And how about receiving an alert each time one passes by such a location?
This tool would allow you to identify and mark places of potential interest. A PoI could be your office locations, warehouses, delivery points, pickup/drop-off points, project sites etc.
- Suggestions based on the frequency of visits and other criteria.
- Set spot fence alerts.
- Generate reports based on saved PoI.
- Saves time in sorting out frequently visited locations.
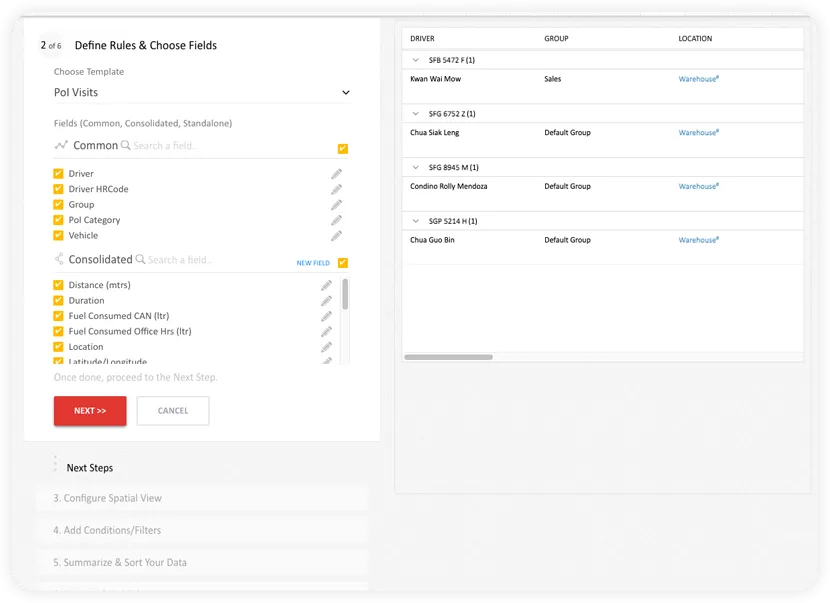
Reports based on PoI
Apart from the alerts you receive, AVLView lets you create and view various reports based on the Landmark/PoI marked on the map.
Advanced filter option lets you filter reports based on POI category also.
These informative reports help you analyse and Identify vehicle usage in different Landmarks and helps to have better control in assigning vehicles to different locations.
- PoI to PoI.
- Poi To Poi – Round Trip.
- Poi Visit Summary.
- Zone/PoI based Vehicle Status.
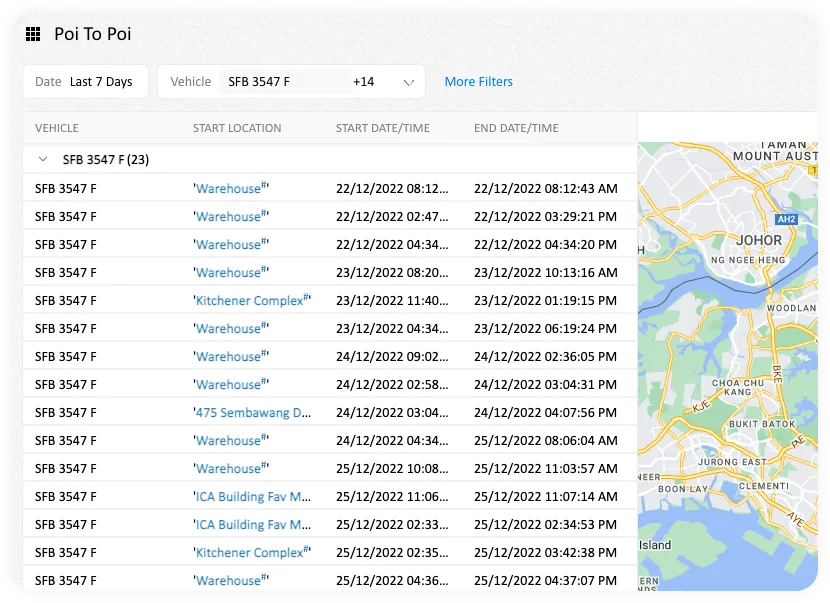
PoI to PoI report
These reports provide trip details, including each vehicle’s route and mileage between PoIs (points of interest). It gives a clear picture of your vehicles’ activities over time.
- Information on start and stop points (PoIs).
- Provide details on start time and end time.
- Details on distance travelled.
- Details on fuel consumed during the trip.
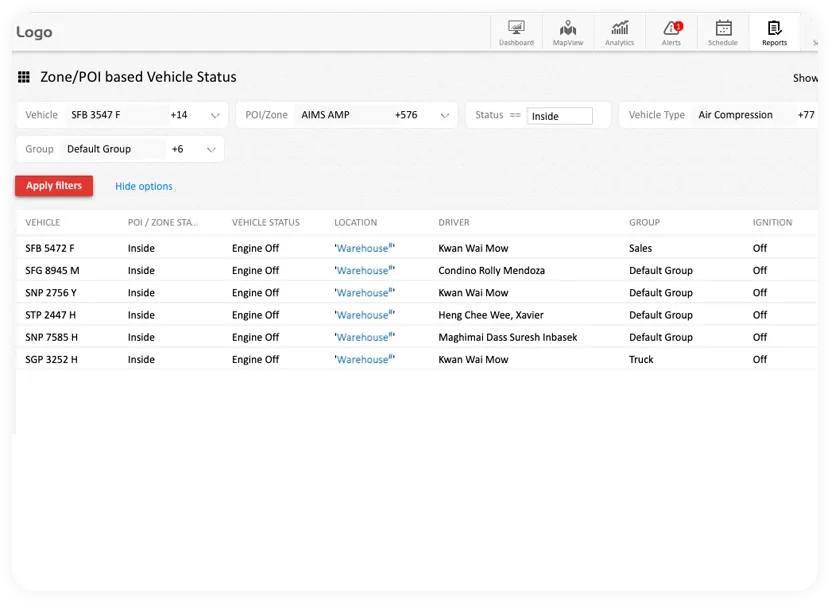
Zone/PoI based vehicle status
Status reports based on a Zone/PoI are auto generated in the platform to give you a clear picture of your vehicle’s status.
This report lets you have a clear idea of all your fleets based on PoI/Zone and provide information on status of a vehicle viz.,
- Inside/Outside a PoI/Zone.
- PoI location.
- Engine status-ON/OFF.
- Speed of the vehicle etc.
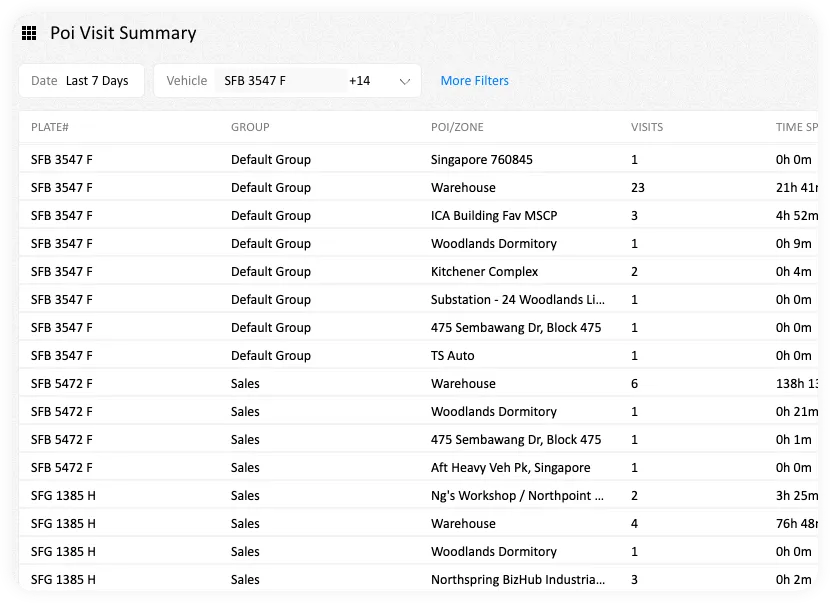
PoI visit summary
The PoI visit summary report gives an in depth detail on the visits by your vehicles in each PoI.
PoI visit summary helps in eliminating the time in filtering details of each PoI visit made by your fleets.
A PoI visit summary can provide you information on
- The PoI visited by your vehicle.
- The total number of PoI visits made by your vehicle.
- Time spent in each PoI location.
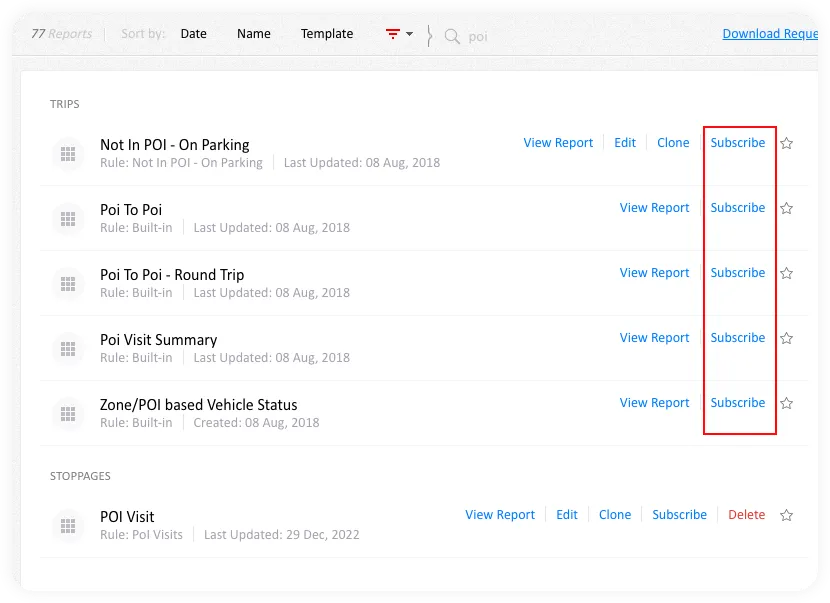
Subscribe to PoI reports
You may opt to subscribe to a PoI report to get an overview of your vehicle activities in PoI or zones for a specific time period.
Reports can be subscribed for Once, daily, weekly or monthly basis.
- Very helpful if you wish to send a report on a timely basis.
- Choose a predefined time to send reports.
- Option to add or remove subscribers.
The user interface is simple and easy to use. The platform is intuitive, and the reports provided are comprehensive.

Energy Control Tech Saudi Arabia.
The user interface is simple and easy to use. The platform is intuitive, and the reports provided are comprehensive.

Frequently Asked Questions
PoI stands for points of interest and these are locations or useful places on a map.
A PoI could be an office location, warehouse, distribution centre, delivery point, restaurant, hotel etc.
Every PoI has a specific Latitude and Longitude on the map.
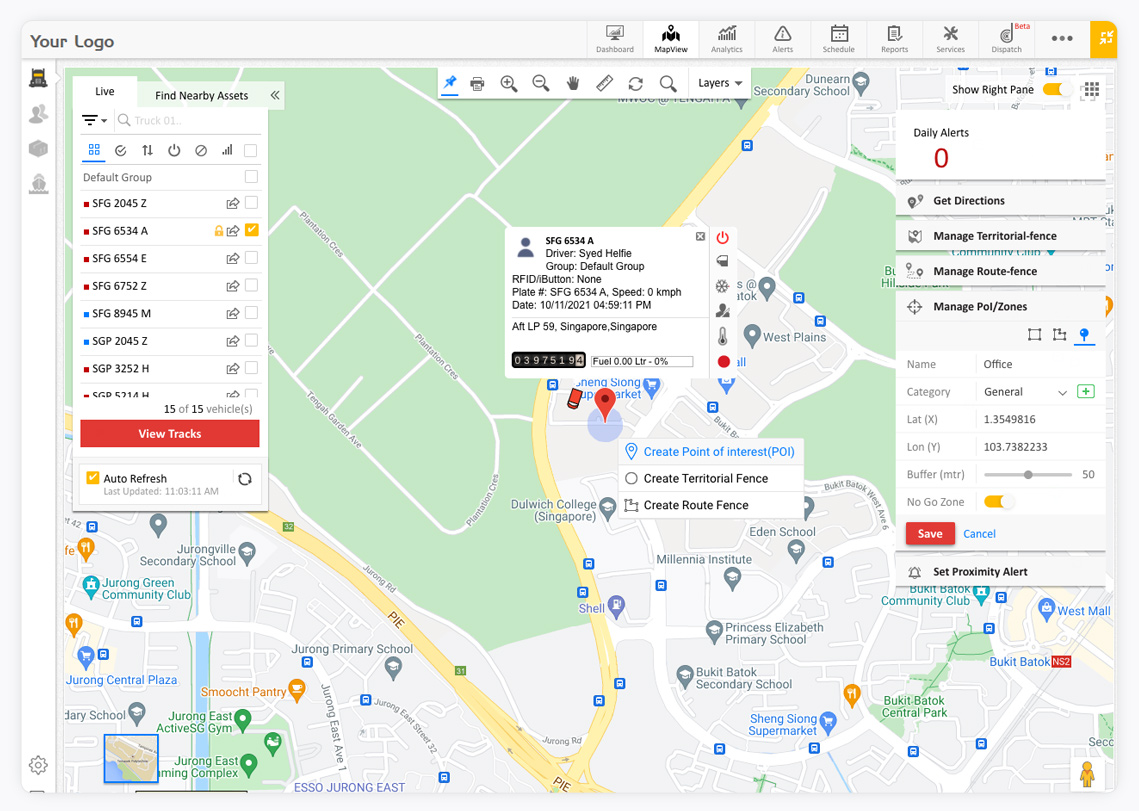
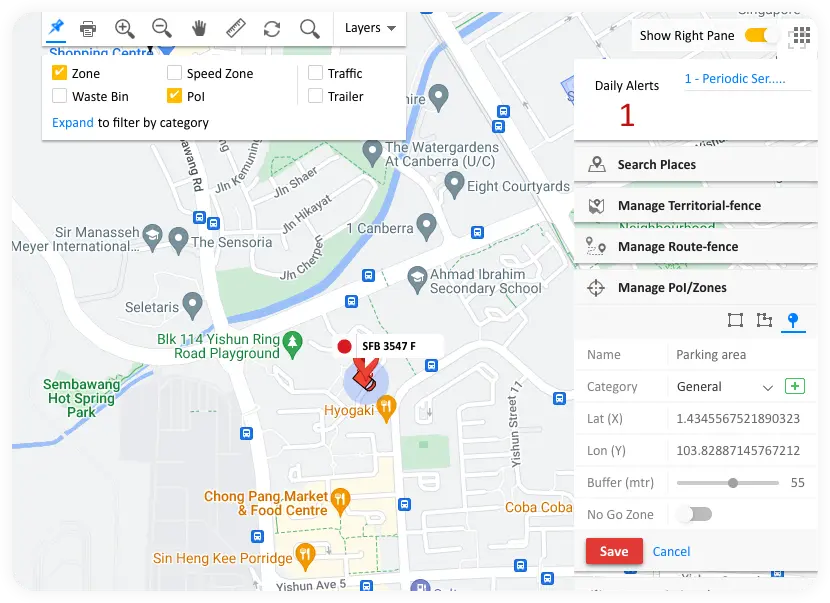
You may easily create a PoI/Zone from MapView >> Manage PoI/Zones.
Click the “+” icon and choose the desired shape; Rectangle, Polygon or PoI, then click and drag the point displayed on the edge (of rectangle or Polygon) to adjust the area of the PoI/Zone which you are going to create.
If you have opted for the PoI icon, please use the buffer metre to adjust the radius.
Once you have decided on the Zone, name and save the newly created PoI.
Help video – Creating a PoI/Zone on the map
Location perimeter can be amended from MapView >> Manage PoI/Zones.
In the search box, type the name of the POI you wish to edit, press ‘Enter’ and select the PoI name.
In MapView, click and drag the POI marker to the desired location and change the POI name, buffer, etc.
Once done, save the changes.
A spot fence alert can be set from Settings >> Alerts Overview.
Click ‘Manage’ in Alerts Overview and choose “Spot fence” from the dropdown list by clicking the settings icon shown on the top right corner of the screen, then save the changes.
‘Spotfence’ alert will get displayed on the alerts one view dashboard. Click the edit icon shown below spotfence and choose the PoI or Zone for which you wish to set the alert for.
Choose the required information, select the users to be notified and the mode of alert(s) to be received.
Once done, save the changes.
Help video – Creating a spot fence alert
You may set a proximity alert from MapView.
Enable the toggle button to show the right pane option and choose ‘Set proximity alert’, then save the changes.
Click ‘create’ shown under proximity alert and place the bell icon to a desired location (adjust the buffer metre if required) and save the changes after naming the Proximity.
You opt ‘Remember’ to receive alerts on a recurring basis.
To receive a notification every time your vehicle enters or exits the office premises, you may create a Spotfence alert from Settings >> Alerts Overview.
Choose ‘Spotfence’ from alerts drop down list (click settings icon on the top right hand corner of the screen) and click save to view the same in Alerts overview.
Edit the alert by clicking ‘+’ symbol shown below Spotfence and choose a spot (Point of Interest or PoI for which you wish to set an alert for) from the dropdown list and select the desired option (enters, exits or stops at a PoI).
Note: If a PoI is not created already, you may create it from MapView by right clicking on your construction site on the map (toggle to enable ‘Show Right pane’ from top right corner of the screen).
Help video – Creating an entry or exit alert
You may make use of the ‘Find nearby assets option’ displayed on the top left corner of the screen and choose a saved location from the down list and adjust the buffer metre as required.
All the vehicles within the chosen area will be displayed on the screen.
Note: If a PoI is not created already, you may create it from MapView by right clicking on your construction site on the map (toggle to enable ‘Show Right pane’ from top right corner of the screen).
You may easily create a territorial fence from MapView >> Manage territorial fence.
Click the “+” icon and choose the desired shape; Rectangle, Circle, Polygon or PoI, then click and drag the point(s) displayed on the edge (of rectangle or Polygon) to adjust the area of the territory which you are going to create.
If you have opted for the PoI icon, choose the duration and use the buffer metre to adjust the speed of the vehicle in kms.
Once you have decided on the territory, name and save the newly created territory.
Help video – Creating a Geofence or Territorial Fence
A territorial fence alert can be set from Settings >> Alerts Overview.
Click ‘Manage’ in Alerts Overview and choose “Territorial fence” from the dropdown list by clicking the settings icon shown on the top right corner of the screen, then save the changes.
‘Territorial fence’ alert will get displayed on the alerts one view dashboard. Click the edit icon shown below Territorial fence and choose the PoI or Zone for which you wish to set the alert for.
Under the “Receive alert when” choose Enters/Exits territory.
Choose the required information; vehicle or vehicle group(s), active hours of alert, users to be notified and the mode of alert(s) to be received.
A park fence can be created by opting to create a PoI/Zone from MapView.
Click the “+” icon and choose the desired shape; Rectangle, Polygon or PoI, then click and drag the point(s) displayed on the edge (of rectangle or Polygon) to adjust the fence (virtual) surrounding your parked vehicle.
Once you have decided on the virtual fence/zone, name and save it.
A park fence alert can be set from Settings >> Alerts Overview.
This alert can also be set by following the steps:
Click ‘Manage’ in Alerts Overview and choose “Territorial fence” from the dropdown list by clicking the settings icon shown on the top right corner of the screen, then save the changes.
‘Territorial fence’ alert will get displayed on the alerts one view dashboard. Click the edit icon shown below Territorial fence and choose the virtual park fence (PoI or Zone) for which you wish to set the alert for.
Under the “Receive alert when” choose “Exits Territory”.
Choose the required information; vehicle or vehicle group(s), active hours of alert, users to be notified and the mode of alert(s) to be received.
Once done, save the changes you have made.
You may create a route fence from MapView >> Manage Route-fence.
Enable ‘Show Right Pane” from MapView and choose ‘Manage Route Fence”.
Click the ‘+’ icon and click on the map to pinpoint spots through which you wish to create a route. You may keep on clicking until a route that includes your via point gets created.
You may click and move a viapoint to change the route.
Once done, name the route and save the changes.
Help video – Creating a route fence
Route fence alert can be configured from Settings >> Alerts overview (Manage).
Click ‘Manage’ in Alerts Overview and choose “Route fence” from the dropdown list by clicking the settings icon shown on the top right corner of the screen, then save the changes.
‘Router Fence’ alert will get displayed on the alerts one view dashboard. Click the edit icon shown below Route fence and choose the route for which you wish to set the alert.
Choose the required information, select the users to be notified and the mode of alert(s) to be received and save the changes.
Help video – Setting a route fence alert
Regain control with Live GPS vehicle tracking!
Sign up for a trial account today.
![]()
AVLView is a telematics platform that helps vehicle owners automate everyday fleet operational tasks. If your GPS tracking system doesn't live up to, then consider upgrading to AVLView fleet management software.