Concox - Configure GT06 GPS Device
This guide shows how to configure the Concox GT06 GPS tracker to work with AVLView — the APN and server settings the device needs to start reporting location.
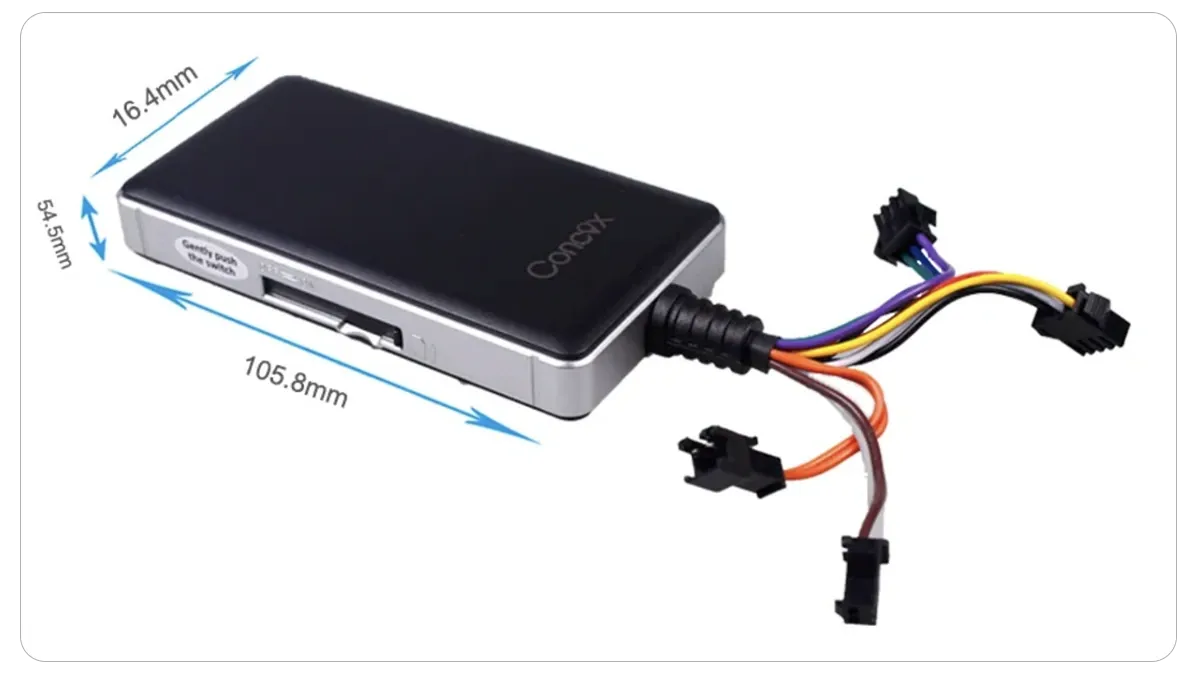
Concox’s GT06 GPS tracking device—which is integrated with the platform—is one of the most widely used devices in this industry.
Img src – https://iconcox.com
The GT06N GPS vehicle tracker has earned a reputation for high quality and ruggedness through years of customer satisfaction.
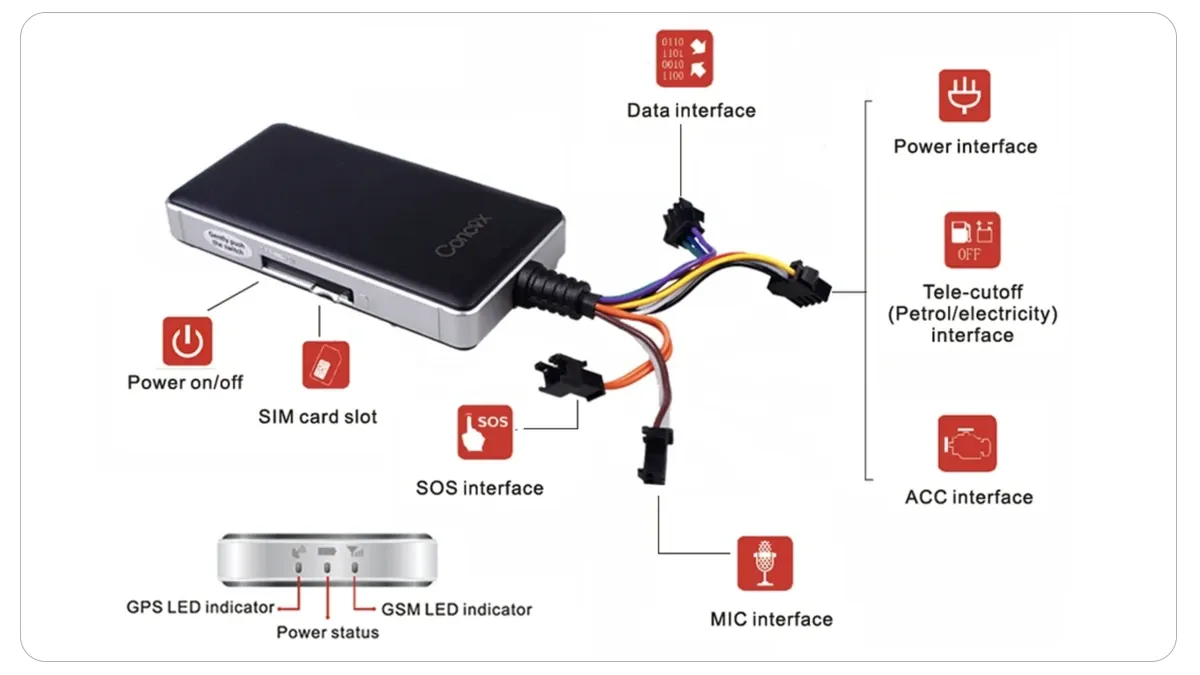
The GT06N has all the standard telematics functions like GPS tracking and ACC status, plus more advanced features like an SOS button and audio monitoring. It helps to track your fleet’s daily activities and helps you gain control of the entire fleet operation.
| Frequency | WCDMA 850/900/1900/2100MHz & GSM 850/900/1800/1900MHz |
|---|---|
| Data Transmission | HSPDA/EDGE/GPRS |
| Operating Voltage | 9-34VDC<300mA |
| Location Time | Cold Start:<35s |
| Hot Start: | <2s |
| Location Accurancy | <10 meters |
| Operating Temperature | -20C ~ + 70C |
| Dimension | 98.5(L)x 52(W)x 15(H)mm |
| Weight | 80g |
**Cables and Ports
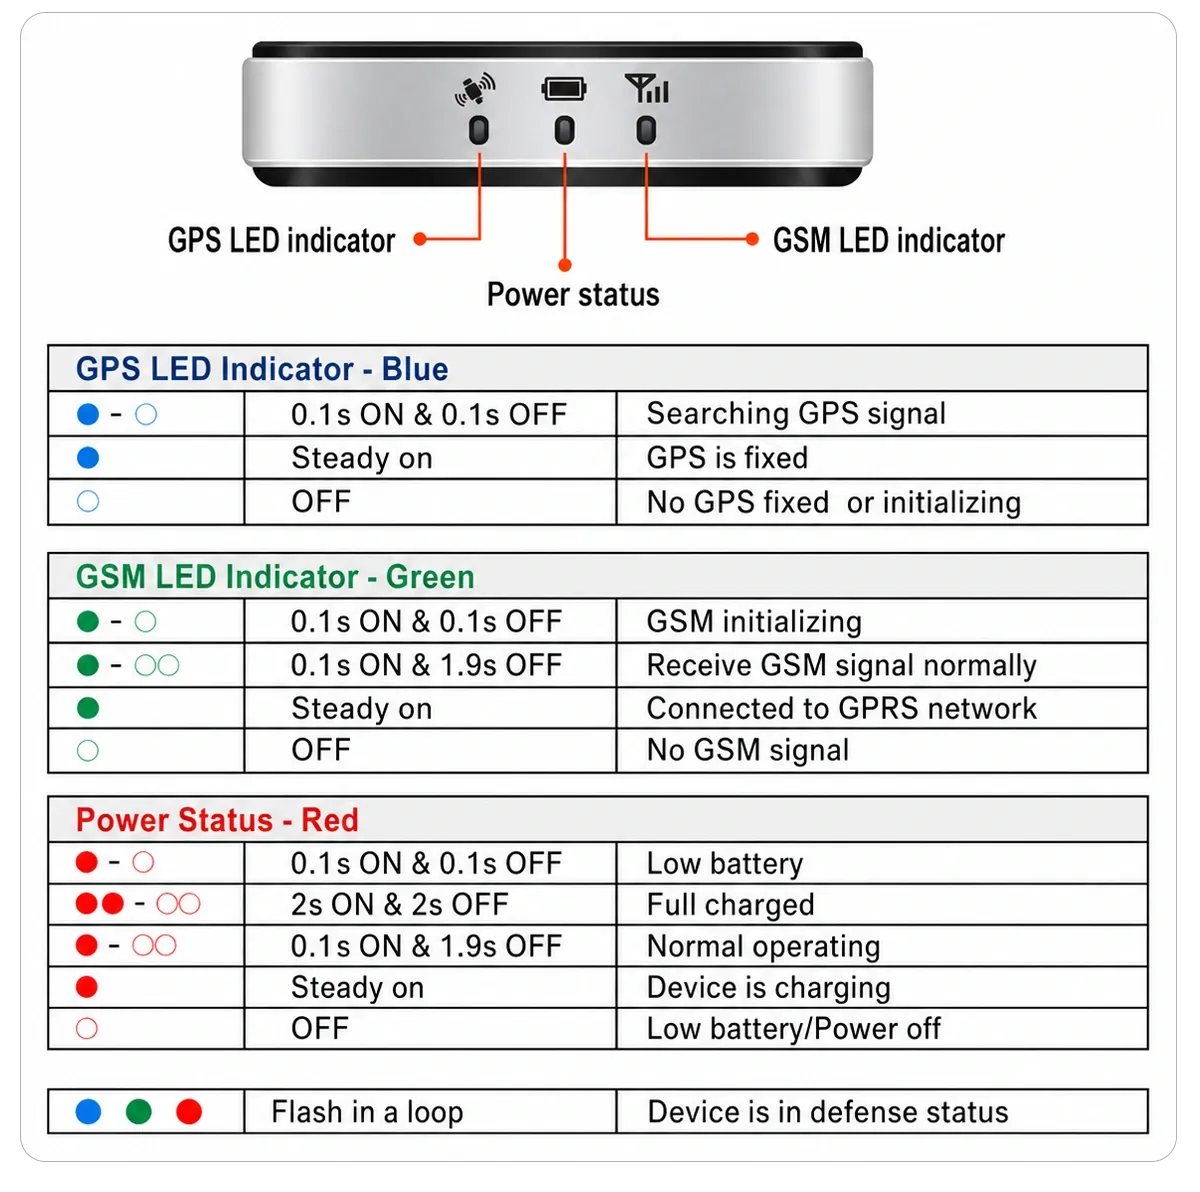
LED Indicators
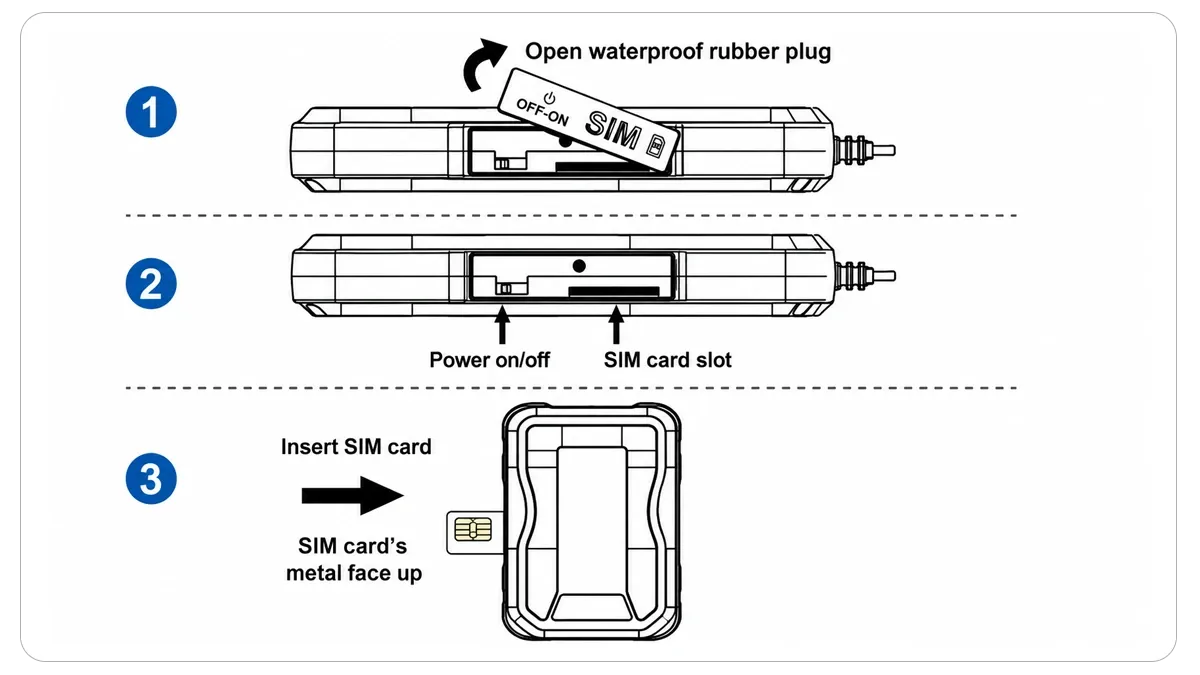
Insert your SIM card
Img src – https://iconcox.com
Device wire definition
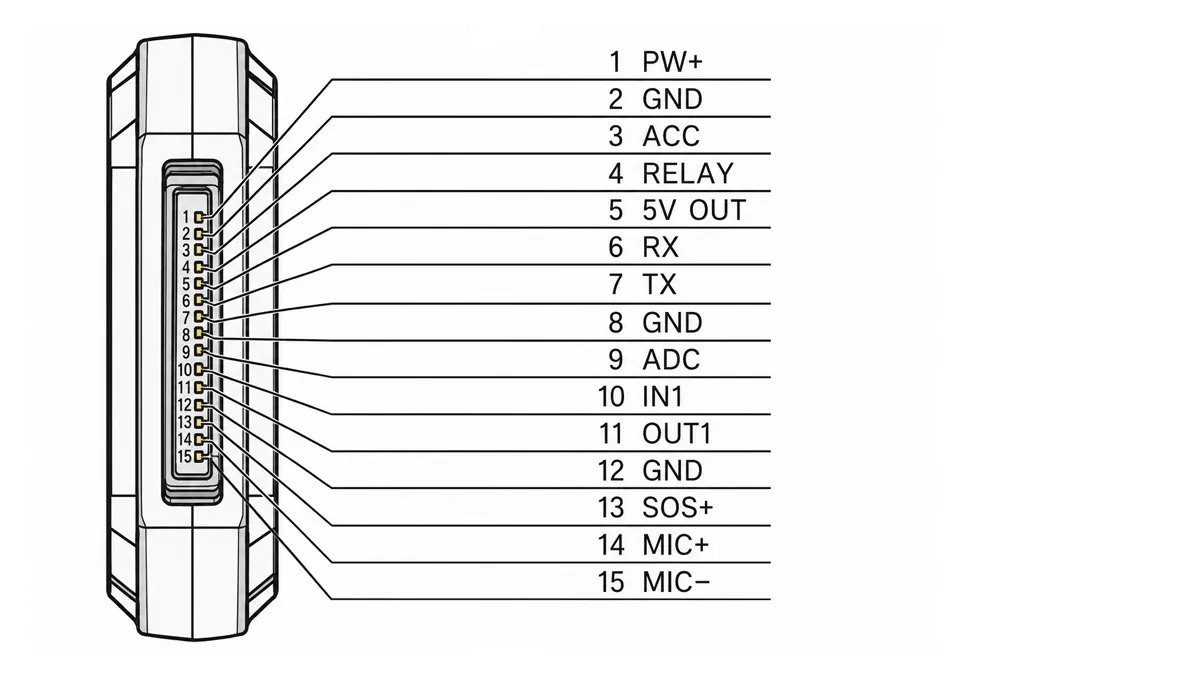
Img src – https://iconcox.com
Wire colour definition
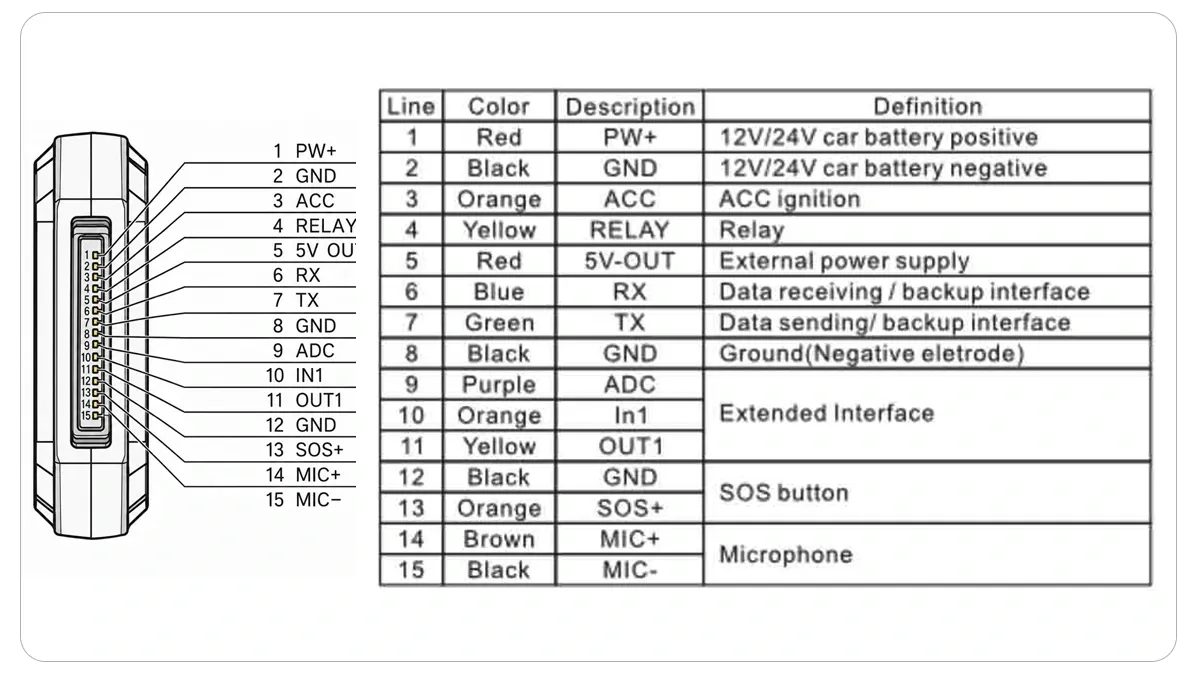
Img src – https://iconcox.com
- Connect the Red wire (PW+) to the 2 Amp fuse that is connected to the +ve end of the vehicle power source (battery).
- Connect the Black wire (GND) to the +ve end of the vehicle battery
- Connect the Orange wire to the vehicle’s ACC switch.
Tip: Keeping the GPS device horizontal ensures proper GPS signal reception.
Configuring Concox GT06
Once installation is complete, the data SIM card must be inserted into the device and connected to a power source. Next, you will configure your GPS device by following these steps: Before you begin, write down your device’s IMEI number and the GSM SIM card’s serial number.
*IMEI number is usually printed on the bottom of the GPS device or on the device case. The fleet management software requires an IMEI number to register the GPS tracking device.
Let’s take a look at what is involved in configuring a GT06 device.
Step 1: Verify the device
Verify if the GT06 GPS device is functioning properly.
The first step in configuring a GT06 GPS device is verifying it is functioning properly.
To begin using the device, you must first turn it on. The power LED will illuminate, and the device will search for a GPS signal.
The GSM and GPS (blue) LEDs will flash on and off as the device searches for a signal. Once they both stay lit steadily, it indicates that your phone’s connection has been established.
Step 2. Set ports
St ports on your GT06 - APN, Timezone and DNS.
Once the GPS device functionality has been verified, it can be integrated with the application’s cloud platform. GT06 GPS tracker can be easily integrated by sending simple short message service (SMS) commands to cloud servers.
Below are the SMS commands to configure APN, DNS and port number, update interval and device time zone in GT06 devices.
Set APN
An Access Point Name (APN) is a gateway between a telecom carrier and another computer network. A GPS device making a data connection must be configured with an APN to present to the carrier.
Send the following command to set APN: APN,APN-Name#
Response from device “OK”
Set DNS and Port
We need to tell the GT06 device where we want it to send data. Our cloud server’s DNS and port are serv.avlview.com and 6639, respectively, so you can send this text message as a command:
To set DNS and port details:
SERVER,1,serv.avlview.com,6639,0#
Response from device “OK”
Update interval:
The update interval determines how frequently the device transfers data to servers. In this case, we prefer a 20-second data update frequency. You may opt for higher frequencies if you want to save on SIM data.
To set update interval:
Timer,20#
Timezone:
Following is the command to set GPS devices to Greenwich Mean Time:
GMT, E,0,0#
Important Notes:
- Please make sure that the device is powered ON throughout the configuration process.
- The device is supposed to respond with a confirmation text message for each command you send. So please make sure your SIM has active data service
Other useful commands
Check device status (eg: GPS and GPRS status)
STATUS#
Sample response from the device:
“Battery:3.41V,Battery too low! Warning; GPRS:Link Up; GSM Signal Level:Strong ; GPS:Successful positioning, SVS Used in fix:10(11), GPS Signal Level:32,31,32,31,28,29,29,36,32,33; ACC:OFF ; Defense:OFF ”
Note: Device with an active GSM and GPS signal would show “GSM Signal Level:Strong ; GPS:Successful positioning,”
Resetting a device
If the device fails to communicate properly, you may do a device reset by sending the below SMS command.
RESET#
Upon receiving the above command, the device will get reset in 20 seconds.
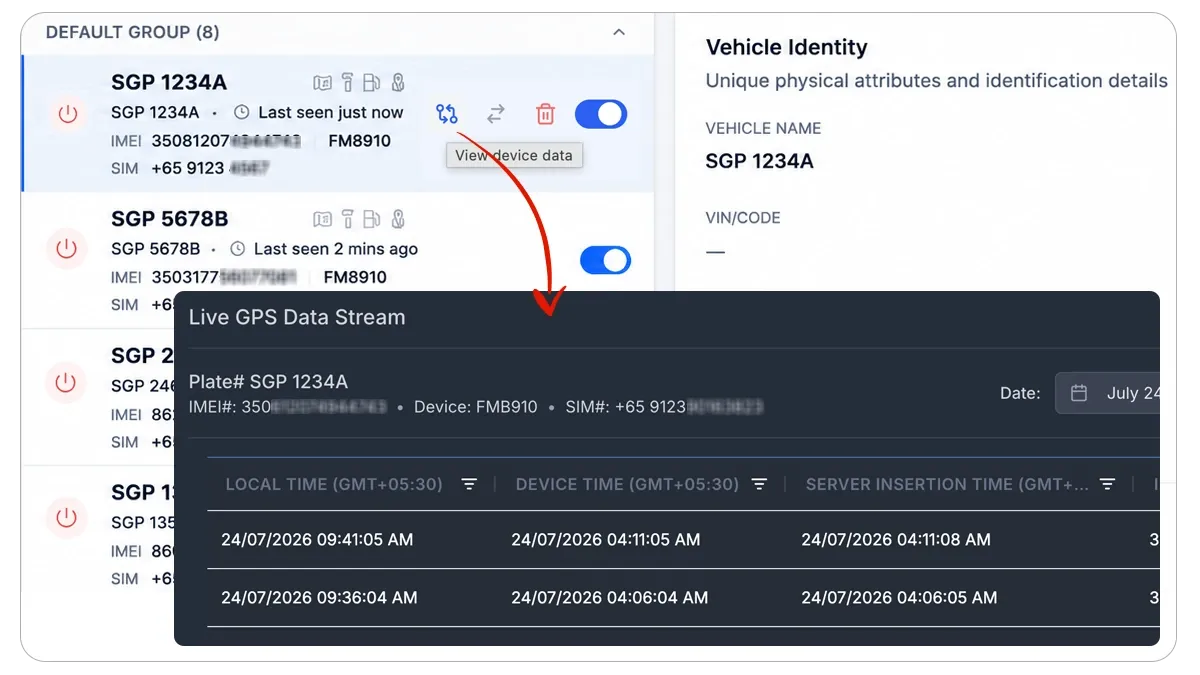
Step 3: Verify device visibility
Check if the device is visible on the platform
Please contact our support team if you still need to create an account.
After you have set the APN, Port details and other settings on your device, log in to the platform with your login credentials and check if it is communicating with the portal.
You may check the device communication by choosing the respective client and device from the partner portal.
Important note: Make sure that the IMEI no’s & mobile no’s you updated against the vehicles are correct.
Summary
Configuration process of the GT06 device is very easy if you follow the correct procedure and commands.
Taking some extra time to verify if the devices are functioning properly can help you eliminate any hindrance in tracking your fleets and assets.
Using Concox GT06 devices can assist you in managing your fleets in the easiest possible manner.
Please don’t hesitate to contact our Client Success Team if you have any other general questions about setting up GPS devices or GPS tracking devices.
Additional information on GT06 device:GT06 device manual
Related
Frequently asked questions
Is my device supported?
AVLView is device-agnostic and works with 200+ GPS models. If you don't see yours, contact support to confirm.
The device isn't reporting after setup.
Recheck the APN and server settings, confirm the SIM has an active data plan, and make sure the device has power. See Troubleshooting.
Learn more about this feature
Explore feature